Goat Milk Butter Recipe (Easy Homemade Butter From Fresh Goat Milk)
Product Disclosure: Kilner provided me with a butter churn at no cost for review. My opinions are based entirely on my own experience using it on my homestead. I only recommend products I personally use, have tested, or believe will be helpful to my readers.

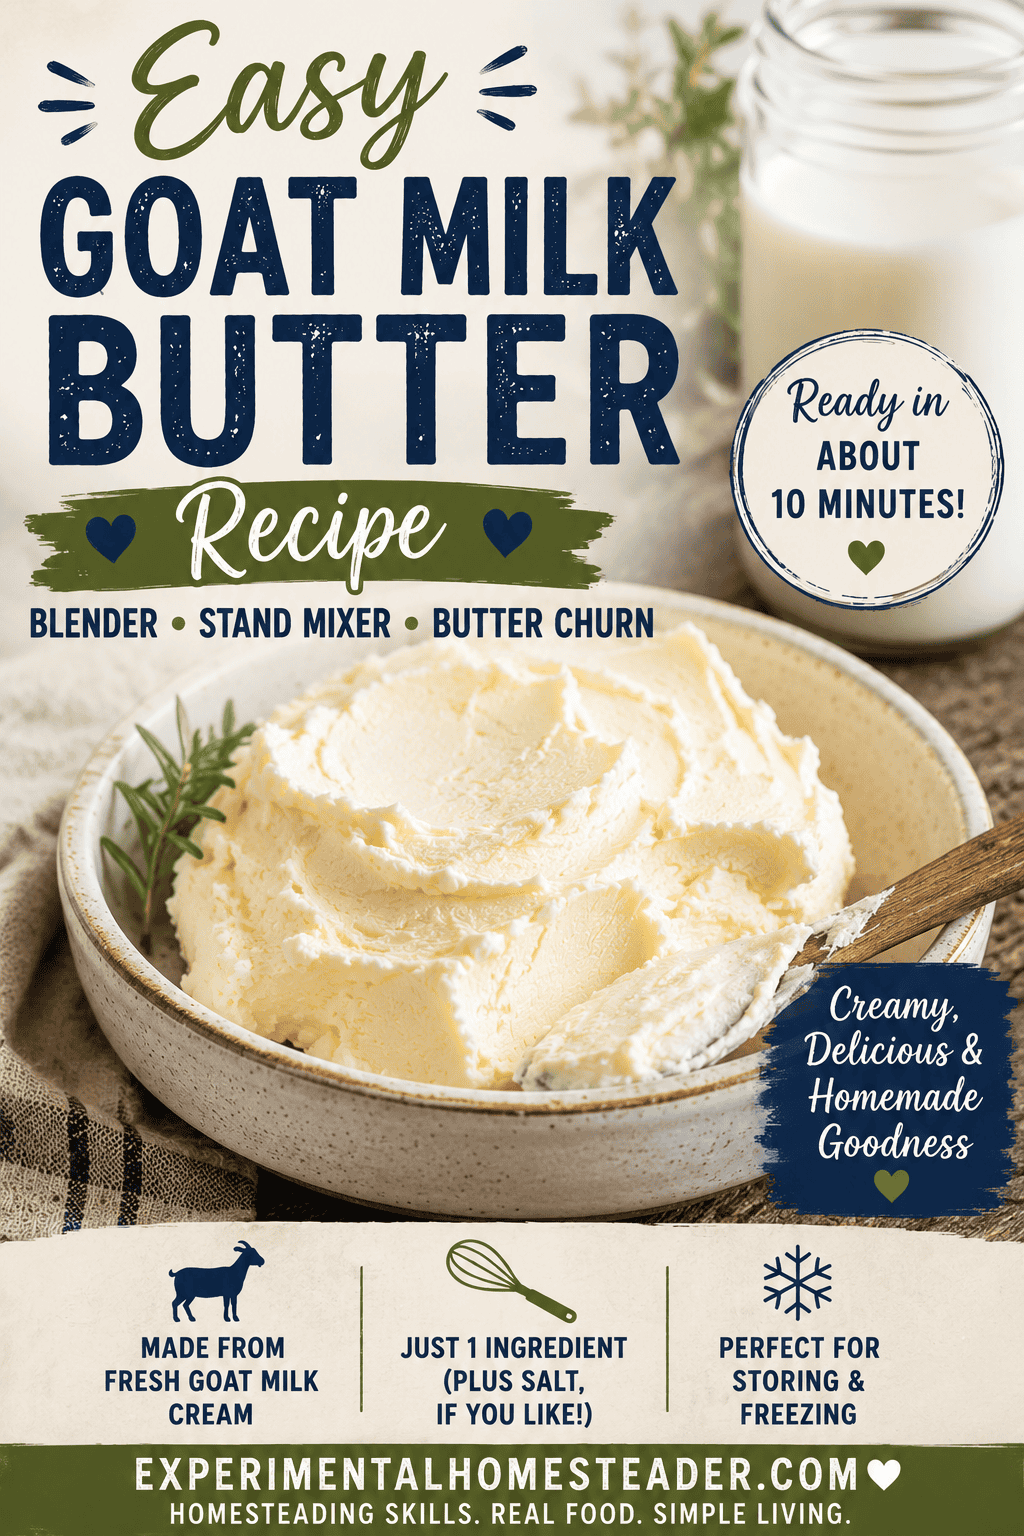
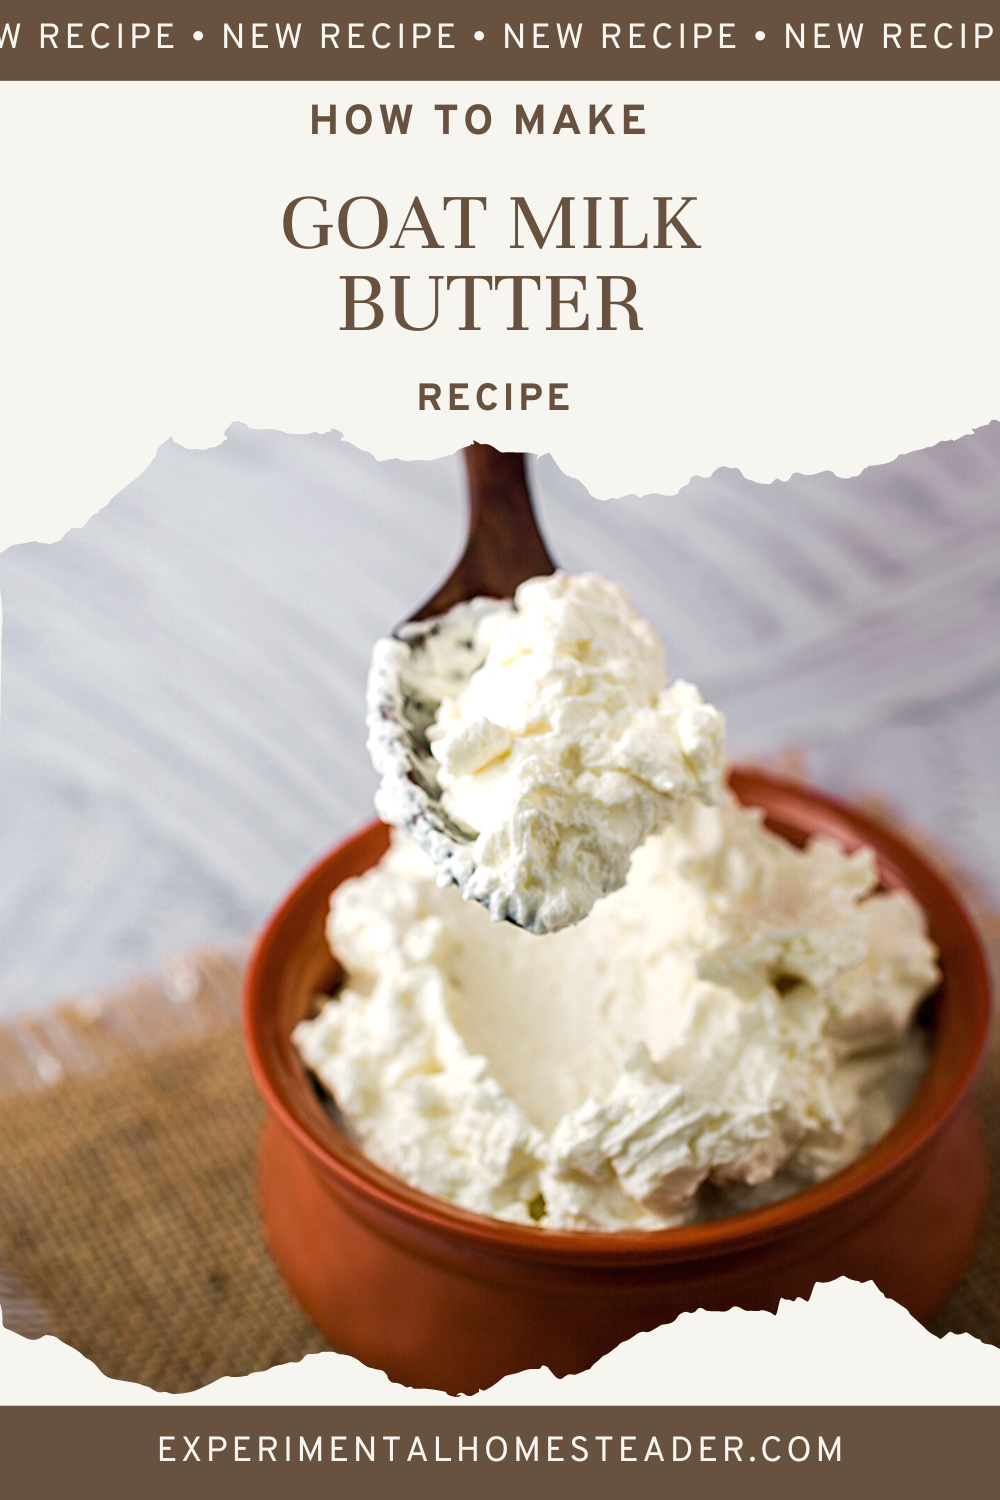
There is something incredibly satisfying about turning a simple jar of fresh goat milk cream into rich, creamy homemade goat milk butter.
The first time I made goat milk butter from my goat's milk, I wasn't trying to create anything fancy. I simply wanted another way to use every bit of the milk my does worked so hard to produce. Like many homesteaders, I hate wasting food, and learning to transform fresh cream into butter felt like taking one more step toward becoming more self-sufficient.
The best part is that making goat milk butter is much easier than most people expect. Whether you use a blender, stand mixer, food processor, mason jar, or an old-fashioned butter churn, the process is surprisingly simple. In just a few minutes, the cream separates into fresh butter and buttermilk with almost no effort.
If you've wondered whether goat milk can be turned into butter, why it looks different than store-bought butter, or why some batches seem harder to make than others, you're in the right place. This guide walks you through the entire process - from collecting enough cream to storing finished butter in the freezer - while sharing the lessons I've learned from years of milking dairy goats and making homemade dairy products on our Indiana homestead.
In this guide you'll learn:
- Why goat milk butter is naturally white
- How much cream you need
- The best equipment to use
- How to troubleshoot butter that won't form
- Ways to flavor homemade butter
- How to store and freeze it
- What to do with leftover buttermilk
What Does Goat Milk Butter Taste Like?
One of the biggest misconceptions about goat milk butter is that it has a strong "goaty" flavor. In my experience, that simply isn't true when you start with fresh, high-quality goat milk and cream.
Goat milk butter tastes remarkably similar to good-quality store-bought butter, but with a richer, fresher flavor that reminds me of homemade dairy products from years ago. It's creamy, smooth, and delicious spread on fresh bread, melted over vegetables, or used in your favorite baking recipes.
The key to great-tasting butter starts long before you begin churning. Fresh milk should be strained immediately after milking and chilled quickly to preserve its mild flavor. Healthy goats, clean milking practices, and proper storage all make a tremendous difference in the finished butter.
I've never noticed my homemade goat milk butter developing an "off" flavor, even after freezing it for several months. As long as it's wrapped well to prevent freezer burn and stored in an airtight container, it keeps its fresh taste surprisingly well.
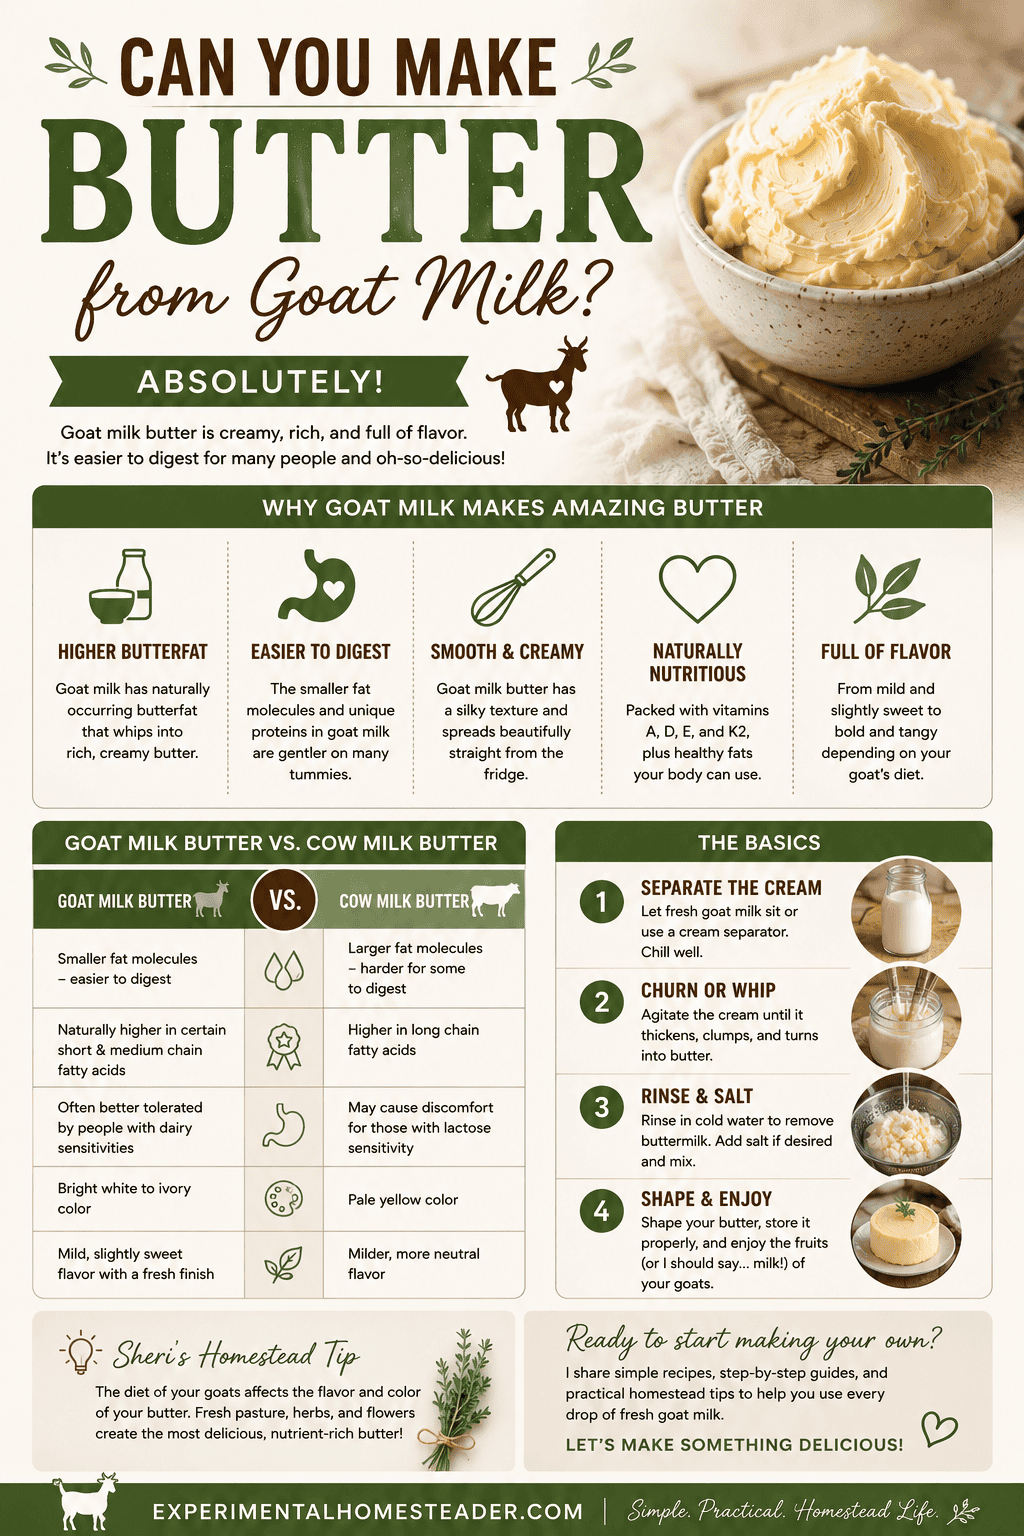
You'll probably notice one visual difference, though. Goat milk butter is naturally much lighter in color than most commercial butter. That's because goat milk contains very little beta-carotene, the natural pigment that gives cow's milk butter its familiar yellow color. Many commercial butters also contain coloring to create a consistent appearance. I don't add any food coloring to mine, so my butter ranges from white to a soft ivory color depending on the season and what my goats have been eating.
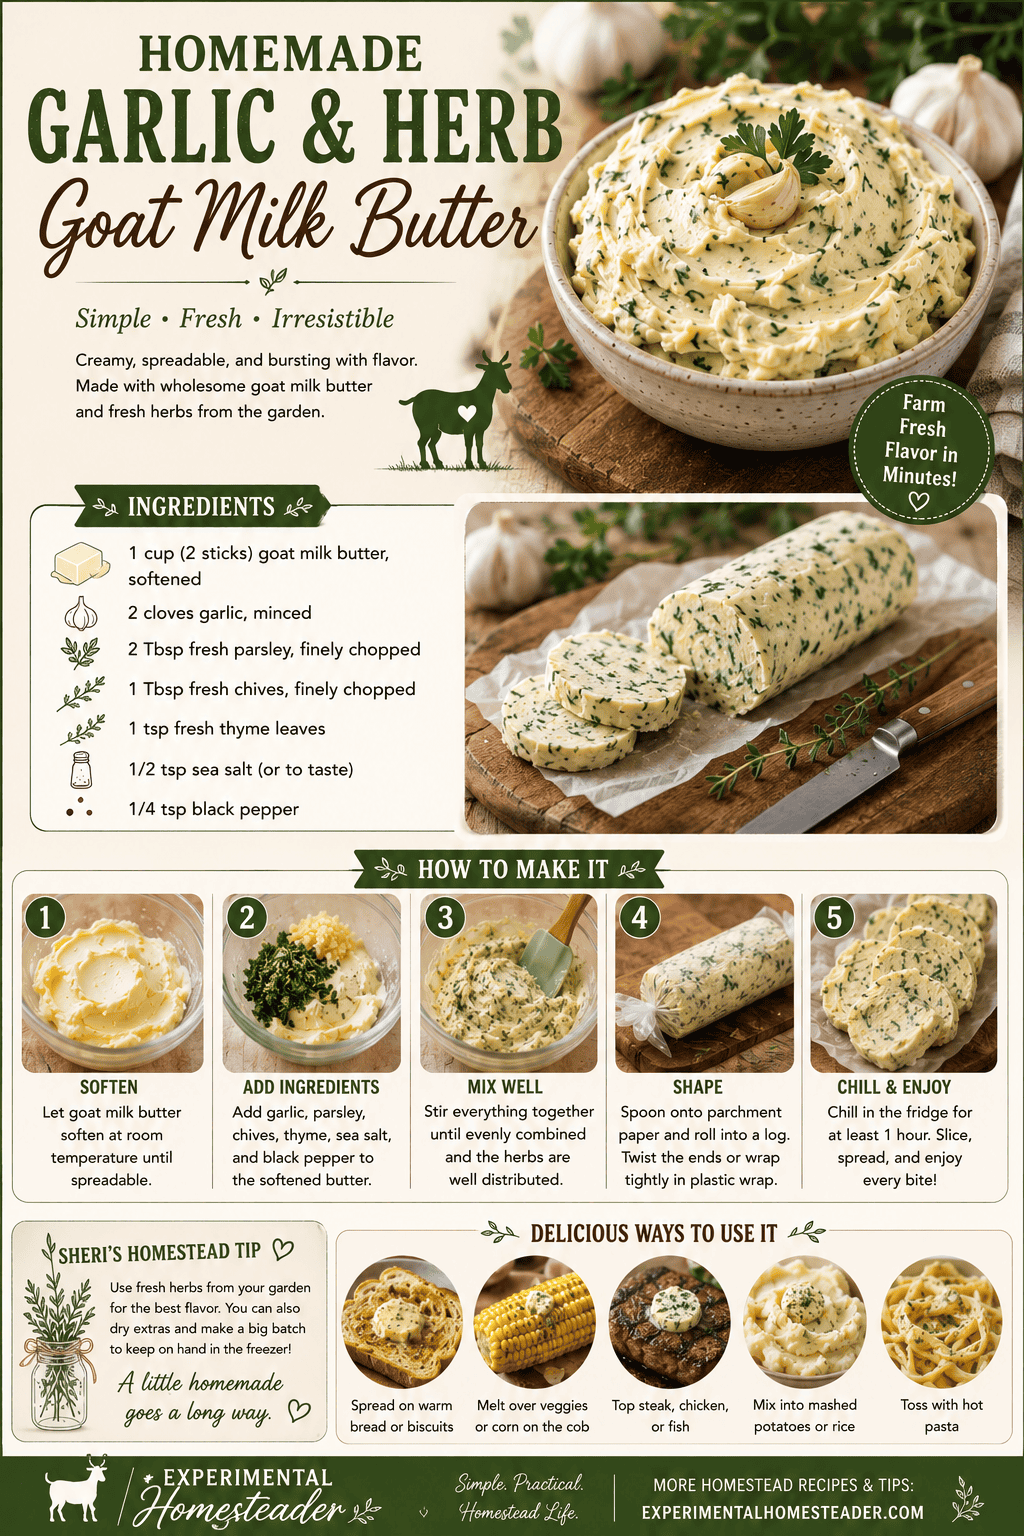
I like to keep my butter simple. Most batches contain nothing more than fresh goat milk cream and a pinch of sea salt. Occasionally, I'll mix in herbs I've grown and dried here on the homestead, such as dill, chives, rosemary, or garlic, for a flavorful compound butter that's perfect on fresh bread, grilled vegetables, or steak.
If you've never tasted homemade goat milk butter before, don't let the word "goat" scare you away. Most people are pleasantly surprised by how mild, creamy, and familiar it tastes -and once you've enjoyed butter made from fresh cream, it's hard to go back to the store-bought version.
🌿 Sheri's Homestead Tip
One of the biggest myths about goat milk is that it always tastes "goaty." In my experience, that's simply not true. Fresh goat milk should taste clean, mild, and creamy. An off flavor is usually caused by poor sanitation, improper handling, storing the milk too long, or allowing a buck's scent to affect the milk - not because it came from a goat. Start with healthy, well-cared-for goats and handle the milk properly, and you'll likely be surprised by how delicious it tastes.
Can You Really Make Butter From Goat Milk?
Yes, you absolutely can make butter from goat milk, and once you've done it a time or two, you'll wonder why more people don't.
One of the biggest misconceptions about dairy goats is that they don't produce enough cream to make butter. The truth is they do - but goat milk behaves differently than cow's milk, so collecting the cream requires a little more patience than it does with cow's milk. That is, unless you invest in a cream separator. Buying one has been one of the best investments I've made since deciding to make homemade butter regularly. Not only does it save time, but it also removes far more cream from the milk than I was ever able to skim off by hand.
I've been making butter from the milk my dairy goats produce for over 20 years now, and it's become one of my favorite ways to use every bit of the milk they give us. When I first started, I collected the cream by skimming it from jars of refrigerated milk over several days. If I didn't have enough cream for a batch, I'd freeze what I had and continue adding to it until I had enough to churn into butter.
Now that I use a cream separator, the process is much faster and far more efficient. Instead of waiting for the cream to slowly rise to the top of each jar, I can separate it almost immediately after milking. I collect significantly more cream this way, which means I can make butter more often while still having plenty of skim milk left for drinking, cooking, baking, or making other dairy products.
The amount of cream you'll collect depends largely on the breed of goat you own. Nubians, like my doe Taboo, are known for producing milk with a relatively high butterfat content, making them an excellent choice for families who enjoy making butter, cheese, yogurt, and other rich dairy products.
If you raise Nigerian Dwarf goats, you're in even better shape. Although they produce less milk overall, it often contains some of the highest butterfat levels of any dairy goat breed. That rich milk can make exceptional butter with a wonderfully creamy texture.
Breeds such as Alpine, Saanen, Toggenburg, Oberhasli, and LaMancha generally produce more milk by volume but with a slightly lower butterfat percentage. You can absolutely make delicious homemade butter from their milk - it may simply take a little longer to collect enough cream if you're skimming it by hand. A cream separator can make a tremendous difference regardless of the breed you're milking.
Another advantage of making your own butter is knowing exactly what's in it. My basic recipe contains nothing more than fresh goat milk cream and a little sea salt. There are no preservatives, artificial colors, or unnecessary additives - just real butter made from fresh milk produced here on the homestead.
Whether you spread it on warm homemade bread, melt it over fresh vegetables, use it to sear steaks, stir it into mashed potatoes, or bake your favorite cookies, you can substitute homemade goat milk butter anywhere you would normally use store-bought butter. In my opinion, the fresh, clean flavor makes everyday recipes taste even better, and knowing exactly where it came from makes every bite that much more satisfying.
Why Goat Milk Doesn't Naturally Separate Like Cow Milk
If you've ever looked at a jar of fresh goat milk and wondered where the cream went, you're not alone. It's one of the most common questions new goat owners ask.
The answer comes down to the structure of the milk itself.
Goat milk contains much smaller fat globules than cow's milk. Those tiny fat particles stay suspended throughout the milk much longer instead of quickly floating to the surface. Because of this, goat milk is often described as being naturally homogenized. It hasn't gone through the commercial homogenization process used by dairy processors, but it behaves similarly because the cream doesn't separate as dramatically.
That doesn't mean there isn't enough butterfat to make butter. The cream is still there - it just isn't as obvious.
Several factors affect how much cream you'll see rise to the top:
- Breed: Higher-butterfat breeds like Nubians and Nigerian Dwarfs generally produce a more noticeable cream layer than some other dairy breeds.
- Butterfat percentage: Individual goats vary, even within the same breed. A doe early in lactation may produce milk that's different from what she produces later in the season.
- Temperature: Milk that is chilled promptly after milking tends to separate better than milk that cools slowly.
- Time: Goat milk often needs to sit longer than cow's milk before any cream layer becomes visible.
If you're skimming cream by hand, refrigerating the milk undisturbed for 12 to 24 hours - or even a little longer - usually produces the best results. You'll likely notice a thin cream layer rather than the thick band commonly seen on raw cow's milk.
If you process a lot of milk, a cream separator can remove the cream much more efficiently than waiting for it to rise naturally. It's not required to make butter, but it can save a great deal of time and recover more of the available cream.
The important thing to remember is that goat milk isn't "missing" the cream. It simply holds the butterfat differently than cow's milk. Once you understand that difference, the rest of the butter-making process makes much more sense.
Tips for Getting the Most Cream From Goat Milk
- Chill the milk immediately after straining it.
- Refrigerate the jars without disturbing them for at least 12 to 24 hours.
- Use shallow, wide containers if you're skimming by hand, as they create a larger surface area for the cream to collect.
- Freeze small amounts of cream until you've accumulated enough for a batch of butter.
- If you process milk frequently, consider investing in a cream separator to save time and increase your cream yield.
Whether you skim cream by hand or use a cream separator, don't be discouraged if your first batch takes a little longer than expected. Every dairy goat, every season, and every batch of milk is a little different. Before long, you'll develop a routine that works well for your homestead and have plenty of fresh cream ready for making butter, cheese, ice cream, and other homemade dairy products.
🥛 Want More Help Using Fresh Goat Milk?
If you're learning how to make the most of the milk your goats produce, I'd love to help! Join my free homesteading newsletter for practical homesteading tips, recipes, and exclusive resources delivered right to your inbox.
Don't Have Enough Cream Yet? Here's What I Do
If you're milking one or two goats, don't feel like you have to make butter every time you collect milk. I certainly don't. Besides you need about two cups of cream to make a fair amount of butter.
Before I bought my cream separator, it sometimes took about a week to collect enough cream for a batch of butter. Even now, there are times when I simply have more important things to do than make butter every two to three days. Homesteading has a way of changing your plans!
Whenever I have extra cream, I pour it into a freezer-safe container, write the date on it, and put it in the freezer. As I collect more cream over the next several milkings, I either freeze another container or add it to the first one if there's room. Before long, I've built up enough cream to make a nice batch of butter without feeling rushed.
Frozen cream works just as well as fresh cream. When I'm ready to make butter, I move the container to the refrigerator about three night's before and let it thaw slowly. Once it's completely thawed, I give it a gentle stir if it has separated a little, then make butter exactly the same way I would with fresh cream.
Don't worry if your cream comes from several different milkings. That's completely normal on a homestead. I've combined cream collected over several days - and sometimes even a couple of weeks - with excellent results. As long as the cream has been handled properly, kept cold, and frozen promptly when needed, your finished butter will be every bit as delicious.
One of the things I've learned over the years is to work with the rhythm of the homestead instead of fighting it. Some days I make butter right away. Other days I let the cream accumulate until I have enough to spend an afternoon making butter, ice cream, or other dairy products. There isn't a right or wrong way to do it - just the way that fits your schedule and your goats.
🌿 Sheri's Homestead Tip
Every batch of homemade goat milk butter is a little different. Butter yield can change depending on the breed of goat, the season, what she's eating, and where she is in her lactation. Don't worry if your butter doesn't make the exact same amount every time - that's one of the things I love about working with fresh milk from my own goats. Every batch is unique.
Raw Milk vs. Pasteurized Milk: Which Should You Use?
One of the questions I get asked a lot is whether you need to use raw goat milk or pasteurized goat milk to make homemade butter.
The good news is that you can use either one.
If you're milking your own healthy goats and handling the milk properly, fresh raw cream churns into beautiful butter.
That said, pasteurized cream also works very well. If you routinely pasteurize your milk before using it, don't worry - you can still make delicious homemade butter. The process is exactly the same once you've collected the cream - and to be honest, this is what I use.
The most important factor isn't whether the milk is raw or pasteurized. It's starting with fresh, clean, good-quality cream. Milk should be strained immediately after milking, pasteurized if that is your choice, then chilled as quickly as possible, and kept properly refrigerated until you're ready to separate the cream or make butter.
If you're using cream that has been frozen, thaw it slowly in the refrigerator before making butter. I've done this many times, and I honestly can't tell the difference in the finished butter.
Whether you choose raw or pasteurized milk is a personal decision. Every homestead is different, and every family has its own comfort level. I encourage you to follow the practices that best fit your situation and local regulations.
If you're new to handling fresh goat milk, be sure to read my article on How to Pasteurize Goat Milk at Home, where I walk through the process step by step. You may also find my guide on How Long Pasteurized Goat Milk Lasts helpful for planning your dairy routine and reducing waste.
No matter which method you choose, the goal is the same: starting with fresh, high-quality cream so you end up with rich, delicious homemade butter you'll be proud to serve.
Salted, Unsalted, and Flavoring Your Homemade Butter
One of the things I enjoy most about making homemade goat milk butter is that I get to decide exactly how I want the finished butter to taste.
Most of the time, I keep it simple and add just a little sea salt. It doesn't make the butter taste salty. Instead, it enhances the natural, creamy flavor while helping draw out a bit more moisture after the butter has been washed. Removing as much moisture as possible helps the butter keep better in the refrigerator.
If I'm making butter specifically for baking, I usually leave it unsalted. That way I can control the amount of salt in whatever recipe I'm making. If the butter is headed straight for the butter bell or butter dish to use on fresh bread, baked potatoes, vegetables, or pancakes, I almost always add a little salt.
I use sea salt because that's what I keep in my kitchen, but don't feel like you need to buy something special just for this recipe. Use the salt your family normally enjoys.
Once you've mastered plain butter, it's easy to make it your own compound butter. Herbs, spices, garlic, citrus zest, honey, maple syrup, and even edible flowers can all be mixed into the finished butter. I always wait until after the butter has been washed and most of the moisture has been removed before stirring in any additional ingredients. That keeps the flavors bright and evenly distributed throughout the butter.
Later in this article, I'll share some of my favorite flavor combinations that have become staples in my kitchen.
What to Expect While Making Goat Milk Butter
If you've never made homemade butter before, the process can seem a little strange the first time. Don't worry - what you're about to see is completely normal.
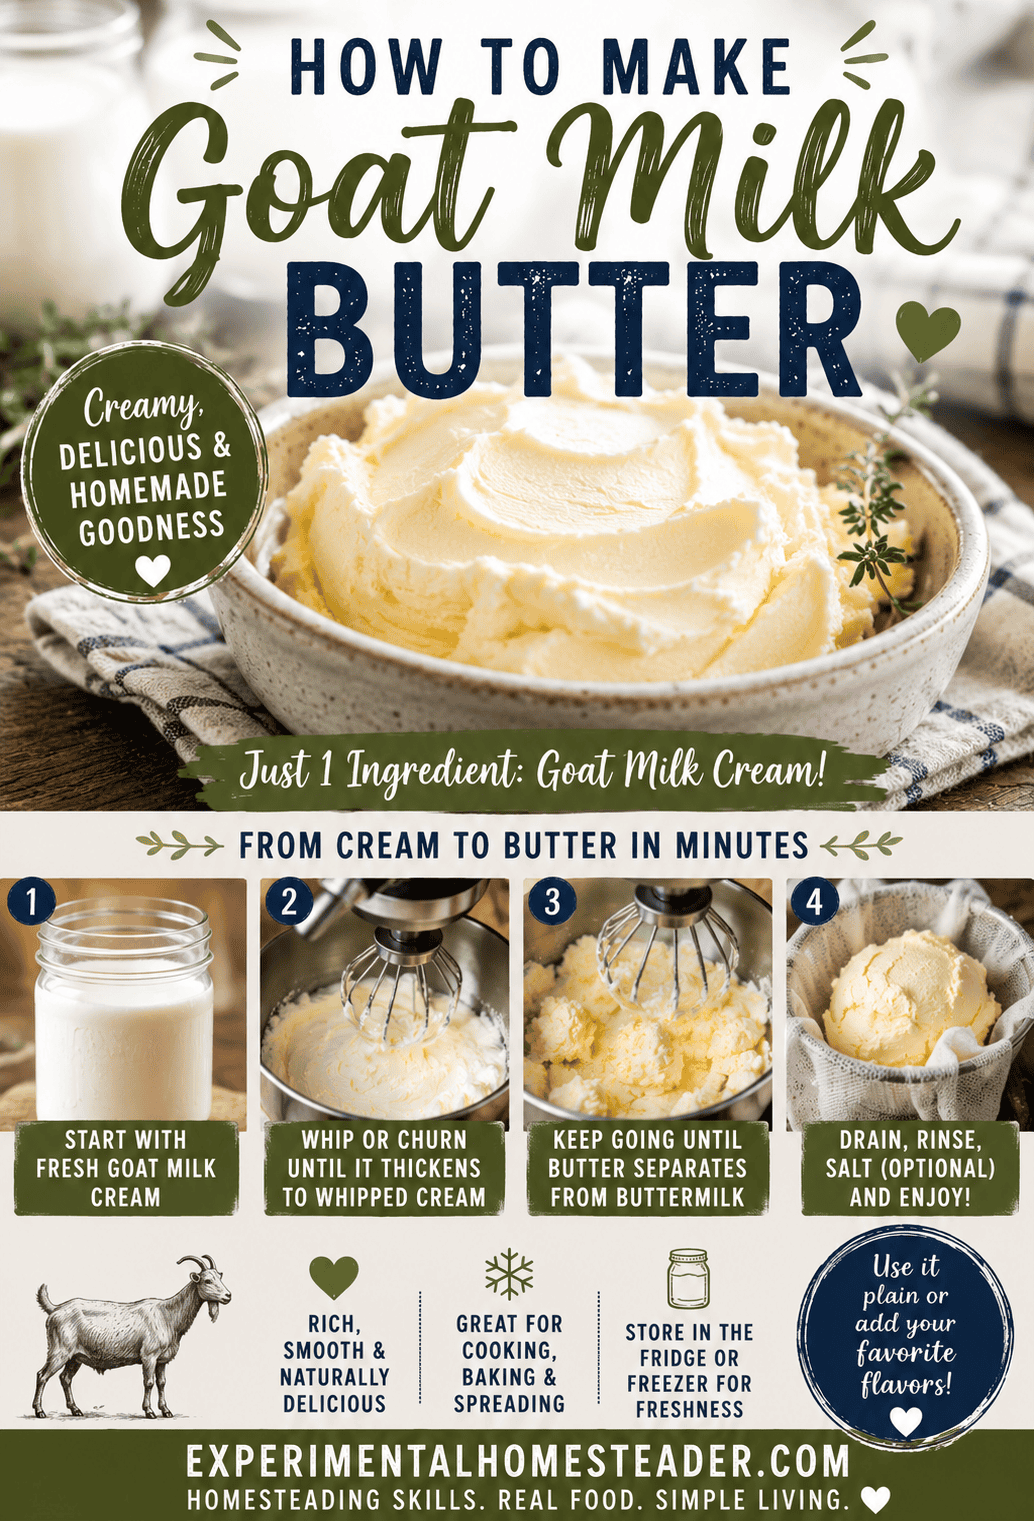
At first, the cream will simply become thicker as air is incorporated into it. Before long, it will look like beautifully whipped cream. This is where many people stop because they think the butter is finished.
It isn't.
Keep blending or churning.
As the cream continues to agitate, you'll notice it begin to look grainy. Then, almost all at once, small yellow clumps of butter will start separating from the liquid. The sound of your blender, mixer, or churn will usually change, too. Instead of a smooth, steady sound, you'll hear the butter beginning to knock around as it forms into larger pieces.
That's exactly what you're waiting for.
Once you have distinct clumps of butter floating in buttermilk, it's time to stop blending. Pour off the buttermilk and save it for another recipe before moving on to washing the butter in cold water.
Don't be discouraged if your first batch doesn't look exactly like mine - or anyone else's. Homemade butter isn't supposed to be identical every single time. The cream, the temperature, and even the time of year can all influence how quickly the butter comes together.
After you've made butter a few times, you'll stop watching the clock and start recognizing the signs. You'll know it's ready by the look of the butter, the sound of the blender, and that satisfying moment when the butter suddenly separates from the buttermilk.
It's one of those simple homesteading skills that gets easier - and more rewarding - every single time you make it.
Equipment You'll Need
One of the things I love about making homemade goat milk butter is that you don't need a kitchen full of expensive gadgets to get started. In fact, my very first batches were made in a blender because that's what I already had in my kitchen.
Over the years, I've tried several different methods, and each one has its advantages. Some tools make the job faster, while others simply make it more enjoyable. The good news is you can start with what you have and add to your collection over time.
Blender
A blender is how I learned to make butter, and it's still one of the quickest ways to turn fresh cream into butter. If you're making a small batch, a blender gets the job done in just a few minutes with very little effort.
KitchenAid Stand Mixer
My KitchenAid stand mixer has become one of my favorite ways to make butter, especially when I'm working with larger batches of cream. I enjoy being able to watch the cream change from liquid to whipped cream and finally separate into butter and buttermilk. Since the mixer does all the work, I can prepare my bowl of cold water or clean up while it's running.
One tip I've learned over the years is to loosely cover the top of the mixing bowl with plastic wrap before turning on the mixer. I leave an opening around the mixer head where the beater attaches, but the plastic wrap catches most of the splashes that happen once the buttermilk begins separating. It's a simple trick that helps keep the underside of the mixer and my kitchen cabinets much cleaner, which means less time cleaning up and more time enjoying fresh homemade butter.
Butter Churn
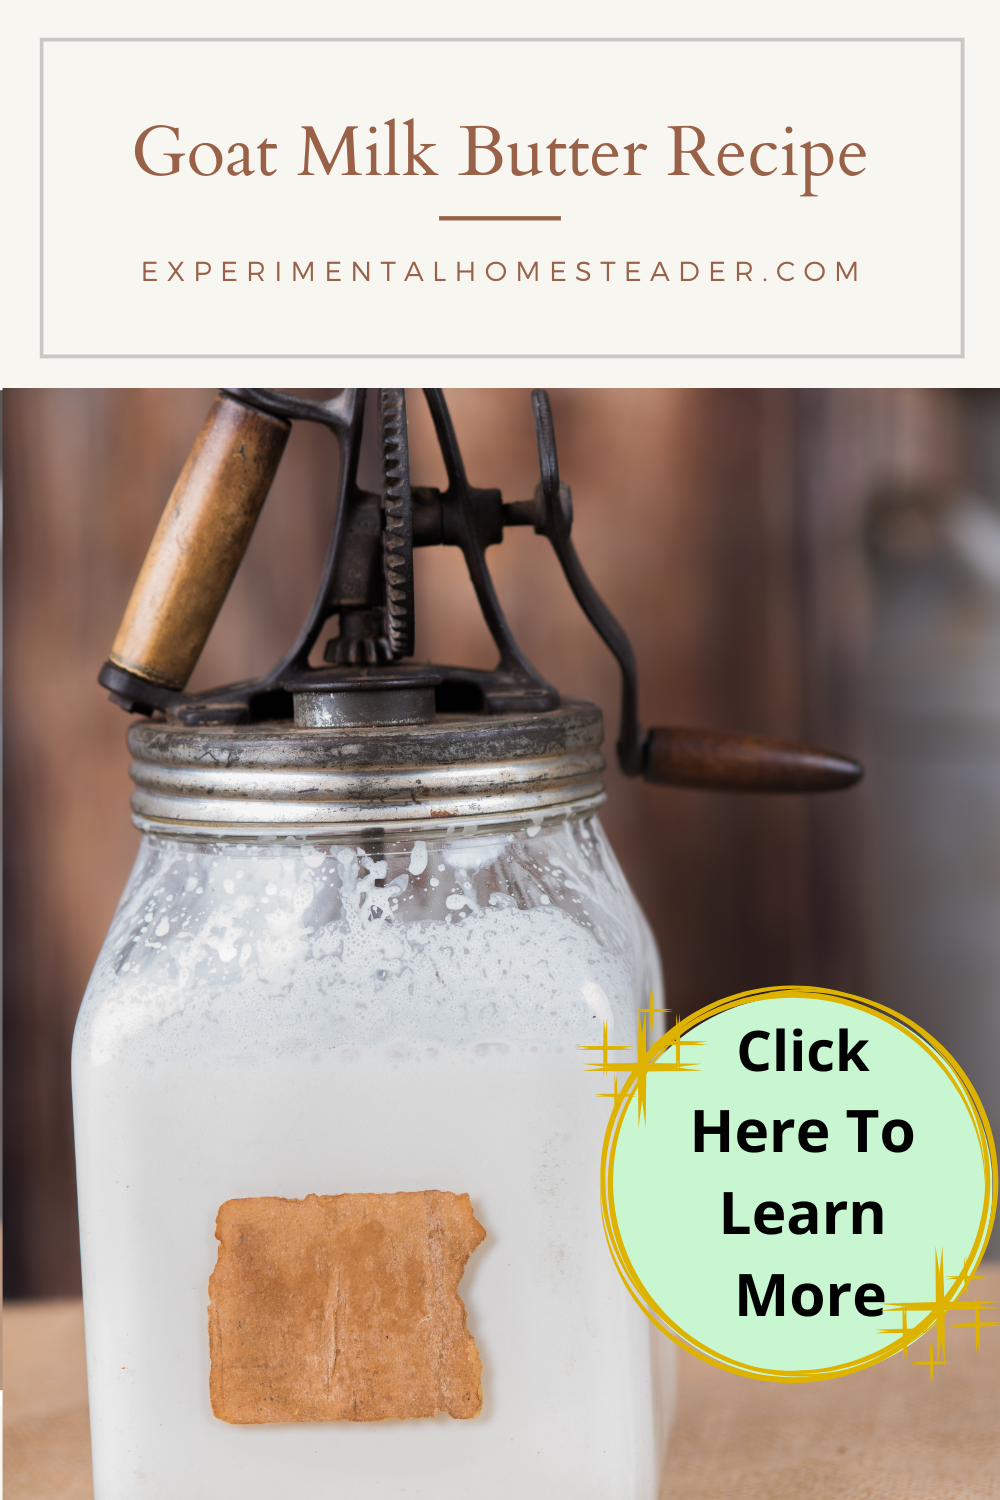
I also own several antique butter churns, and every once in a while I enjoy using it just for the experience. It's a wonderful reminder of how our grandparents and great-grandparents made butter long before electricity. While it isn't the fastest method, it's a fun way to connect with traditional homesteading skills.
Kilner Butter Churn
If you like the idea of making butter by hand but don't want to hunt down an antique butter churn, the Kilner Butter Churn is a wonderful modern alternative. It has the classic look of a traditional glass churn while being easy to use and readily available.
Disclosure: Kilner sent me this butter churn at no cost for review. As always, my opinions are based on my own experience using it here on my homestead.
I enjoy using the Kilner Butter Churn because it gives me the traditional butter-making experience without the maintenance that often comes with antique equipment. The glass jar lets you watch the cream transform into whipped cream and finally into butter, making it a fun project for both adults and children.
While I usually reach for my KitchenAid stand mixer when I need to make butter quickly, I still enjoy slowing down and using the Kilner Butter Churn when I have a little extra time. It's a great choice for anyone who wants the satisfaction of hand-churning butter without investing in an antique churn.
Mason Jar
If you're making a very small batch or want to show children how butter is made, a mason jar is a great option. It takes a little more time and some arm strength, but it's inexpensive, requires almost no special equipment, and is a fun hands-on activity.
One of my favorite old-fashioned butter-making stories is how families used to place a tightly sealed mason jar of cream between the runners - or "legs" - of a rocking chair. As they sat and rocked, the gentle, steady motion churned the cream into butter without anyone having to stand and shake the jar the entire time. It wasn't the fastest method, but it was a practical way to let everyday life do some of the work.
Whether you shake the jar by hand or let a rocking chair help with the job, it's a wonderful way to experience one of the simplest traditional homesteading skills.
Cream Separator
If you regularly milk dairy goats, a cream separator is one of the best investments you can make.
For years, I skimmed cream by hand from jars of refrigerated milk. It worked, but I knew I wasn't recovering all of the cream. Once I bought a cream separator, everything changed. I recover significantly more cream from every milking, which means more butter, more cheese, and less waste. It has easily become one of my favorite pieces of dairy equipment.
Fine Mesh Strainer
A fine mesh strainer is helpful when pouring off the buttermilk because it catches any small pieces of butter that might otherwise be lost. Every little bit counts when you've worked hard to produce your own butter.
Cheesecloth (Optional)
Cheesecloth isn't required for making butter, but I always keep some in my kitchen because it's useful for so many homemade dairy projects. You can line a fine mesh strainer with cheesecloth if you want to catch even the tiniest butter particles, and you'll already have it on hand when you decide to make homemade cheese, yogurt, or other goat milk products.
Mixing Bowl and Spoon
You'll also need a large bowl filled with very cold water to wash the butter after it separates from the buttermilk. I use a sturdy wooden spoon or silicone spatula to gently press the butter, helping remove any remaining buttermilk and excess water.
Butter Paddles (Optional)
You absolutely do not need butter paddles to make homemade butter. For years, I simply used a sturdy kitchen spoon, and it worked just fine.
So why do I own several antique butter paddles?
Honestly, curiosity.
I enjoy learning traditional homesteading skills, and when I came across antique butter paddles, I couldn't resist adding them to my collection. There's something special about using the same type of tools generations of homesteaders relied on long before modern kitchen appliances existed.
I usually save my butter paddles for larger batches. They make it easier to shape the butter while pressing out the remaining moisture, and I do think they're a little faster than using a spoon when you have a lot of butter to work with. One thing I have noticed, though, is that the butter tends to stick to the wooden paddles more than it does to a spoon.
A tip I recently learned - and one I'll definitely be using from now on - is to dip the butter paddles in cold water before using them. The thin layer of water helps keep the butter from sticking as much and makes shaping it a little easier.
Would I tell you to run out and buy butter paddles? Probably not.
If you're just getting started, spend your money on good dairy equipment instead. A spoon works perfectly well, and you can make beautiful butter without ever touching a butter paddle.
But if you enjoy collecting traditional homesteading tools or simply appreciate the history behind them, they're a fun addition to the kitchen. I know I smile every time I pull mine out, because they remind me that making butter is a skill that's been passed from one generation to the next for hundreds of years.
Silicone Butter Molds
One of my favorite modern kitchen tools is a set of silicone butter molds. They shape homemade butter into neat sticks with tablespoon markings, just like the butter you buy at the grocery store. That makes baking much easier because I can cut off exactly the amount I need without measuring or weighing it.
Butter Bell
I absolutely love my butter bells. I own three. They keep homemade butter soft, spreadable, and ready to use while adding a charming farmhouse touch to the kitchen. There's nothing quite like spreading fresh goat milk butter on warm homemade bread, and the butter bell keeps it at the perfect consistency for everyday use.
Don't feel like you need to buy every item on this list before making your first batch. I certainly didn't. Start with the equipment you already own and upgrade as your homestead grows. That's exactly how I built my own dairy kitchen, and every new tool has simply made a process I already loved a little easier.
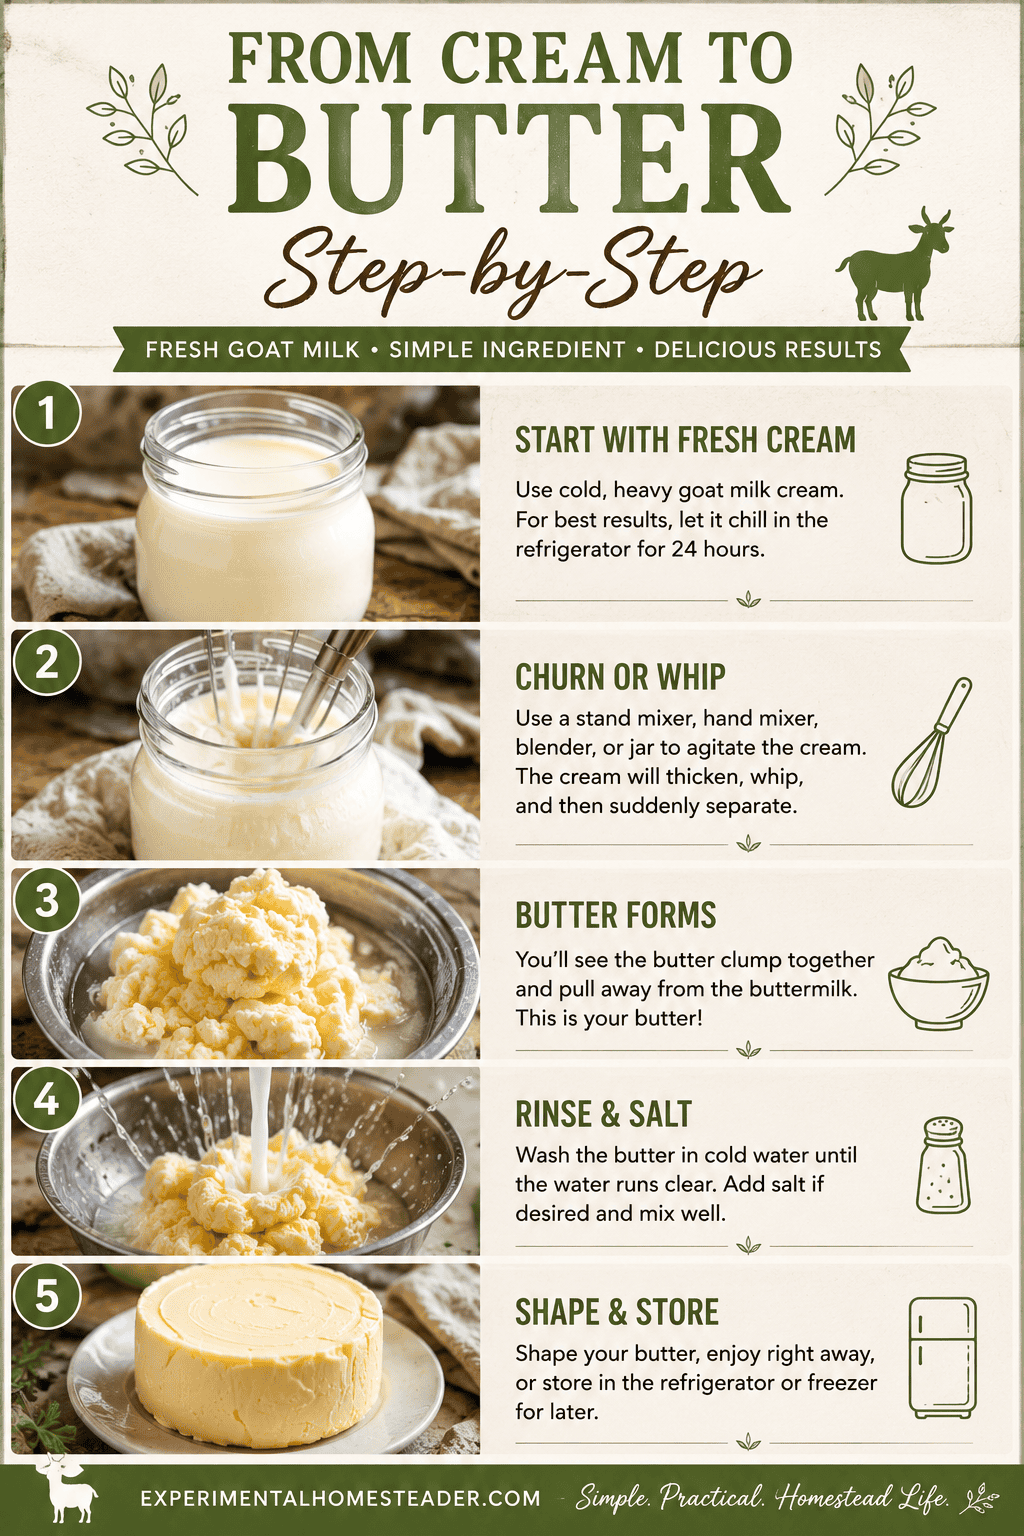
How To Make Goat Milk Butter
Now that you know what to expect, it's time for the fun part - making your own homemade goat milk butter.
Don't let the process intimidate you. Once you've collected enough cream, making butter is surprisingly simple. Whether you use a blender, KitchenAid stand mixer, butter churn, or even a mason jar, the basic process is exactly the same. You'll first have whipped cream, then the butterfat will separate from the buttermilk, and finally you'll wash and work the butter until it's ready to enjoy.
The printable recipe card below walks you through each step, but don't be afraid to make the process your own. After you've made a batch or two, you'll develop a rhythm that works well for your kitchen and your schedule.
If you're a visual learner, I also encourage you to watch the videos above before getting started. Seeing the cream transform into butter makes the process much easier to understand and gives you confidence that everything is progressing just as it should.
Before you know it, you'll be spreading fresh homemade goat milk butter on warm bread and wondering why you didn't try making it sooner.
Recipe at a Glance

Goat Milk Butter Recipe
- Total Time: 10 minutes
- Yield: ½ cup 1x
Ingredients
Instructions
- Put the heavy cream into a blender. You can use a butter churn if you have one.
- Turn the blender on medium high and blend the heavy cream for about 5 minutes. If the blender seems to be bogging down, add a small amount of goat milk to make the contents less dense.
- Once the heavy cream has turned into butter, carefully pour the buttermilk into a container and put it back in the refrigerator. You can use it in recipes or simply drink it.
- Scoop the butter out and put it in bowl with cold water.
- Wash the butter by using a spoon to press it in the water to expose all areas of the butter. This washes the excess buttermilk out so the butter does not spoil.
- Repeat the washing process several times until the water runs clear.
- Once you are sure the butter is clean, squeeze as much excess water out as possible using a spoon.
- Pour the excess water off the butter.
- Sprinkle the salt on top of the fresh butter and work it in with a spoon. Additional water will come off the butter. Simply pour this water off.
- Add in any herbs, fresh flowers or other spices you might want and mix well to combine them. This is an optional step.
- Refrigerate the butter either in a butter bell or a covered dish.
- Keep an eye on it the first day because additional water will accumulate in the dish. Just pour this off.
Equipment
Notes
Note: This butter lasts a week in the refrigerator and about two months in the freezer.
- Prep Time: 10 minutes
- Category: Condiments, Dairy
- Method: No Bake, No Cook

🐐 Enjoy Homemade Goat Milk Recipes?
Join thousands of homesteaders who receive my latest goat milk recipes, dairy tutorials, gardening tips, food preservation ideas, and exclusive printable resources.
Watch The Videos To See How To Make Butter From Goats Milk
Watch how easy it is to turn jars of heavy cream to finished butter.
In the first two videos a blender is used and in the third video an antique butter churn is used.
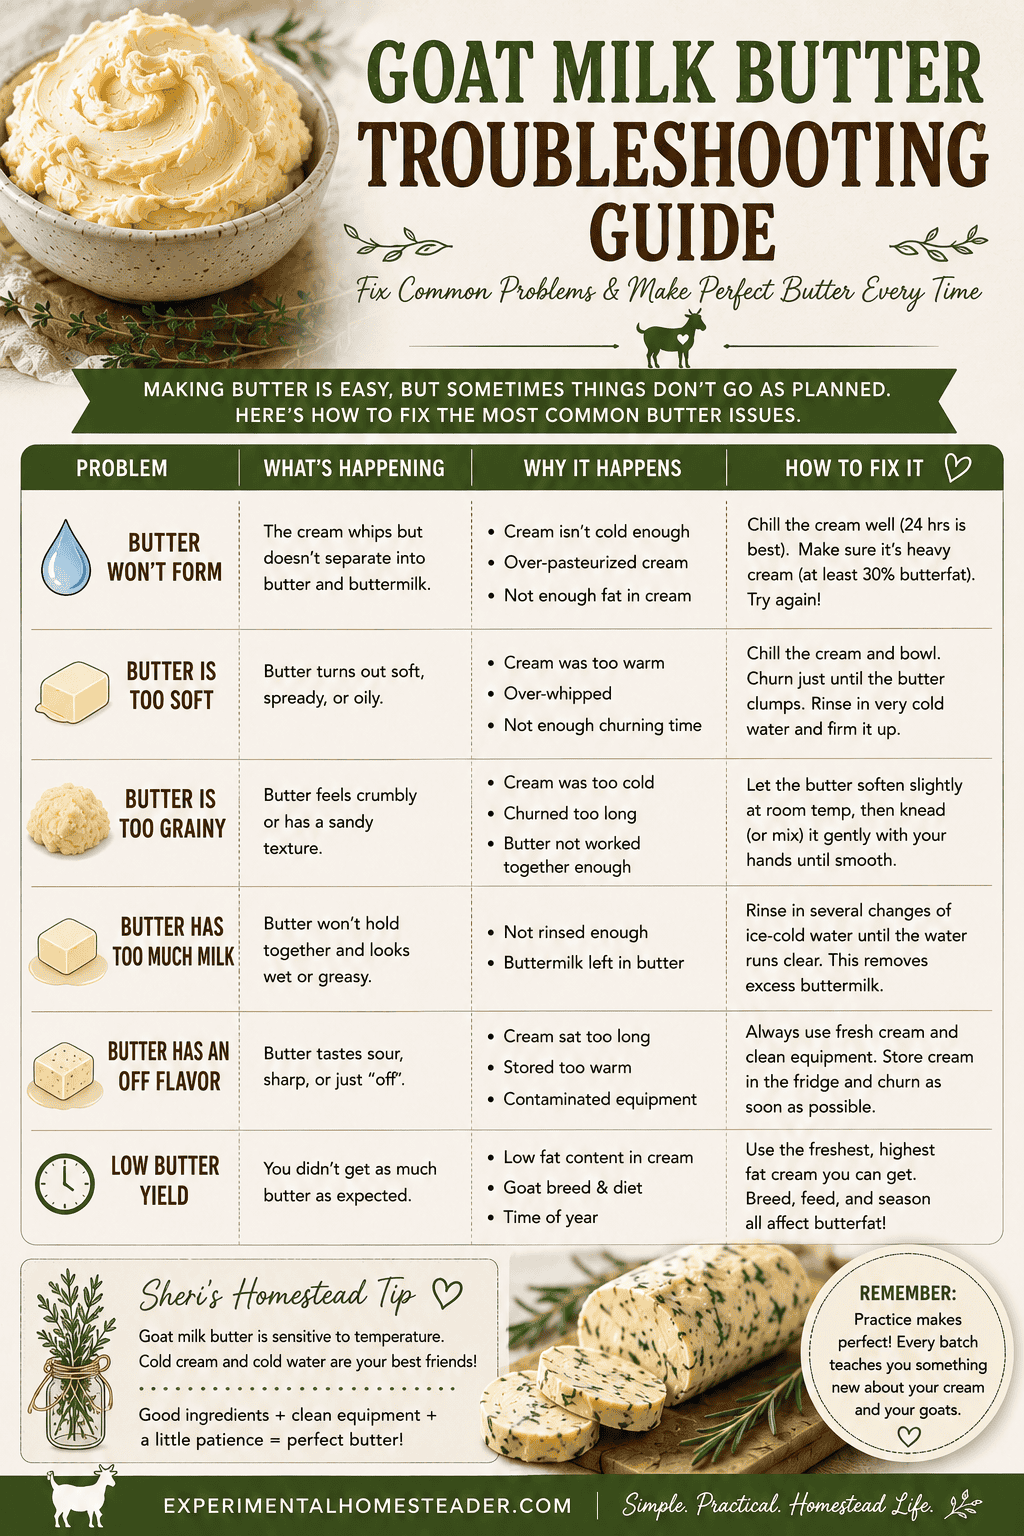
Troubleshooting Homemade Goat Milk Butter
Even after you've made butter a few times, you'll probably run into a batch that doesn't behave quite the way you expected. Don't panic. Most butter-making problems have a simple solution, and fortunately, they're usually easy to fix.
My Butter Won't Form
The most common reason butter won't form is that it simply needs more time. Keep blending or churning. It can feel like nothing is happening, but then suddenly the butterfat will separate from the buttermilk.
If you've been mixing for quite a while and nothing is changing, check the temperature of your cream. Cream that's extremely cold or too warm can take much longer to churn. I get the best results when the cream is well chilled but not ice cold.
My Butter Is Still Whipped Cream
Congratulations - you've made whipped cream!
This happens to just about everyone the first time they make butter. It looks finished, but it isn't.
Keep mixing.
The whipped cream stage comes before the butter forms. As the butterfat continues to separate, the whipped cream will become grainy before finally breaking into butter and buttermilk.
My Butter Looks Grainy
That's actually a good sign.
A grainy texture usually means you're just moments away from butter. Keep blending or churning, and you'll soon see larger clumps begin to form as the butterfat comes together.
My Butter Melted
Butter softens quickly in a warm kitchen, especially during the summer.
If your butter becomes difficult to work with while you're washing or shaping it, simply place it in the refrigerator for a few minutes to firm up before continuing. Using very cold water during the washing process also helps keep the butter firm.
My Butter Tastes Sour
Fresh butter should smell and taste fresh.
If your butter has developed a sour flavor, the cream may have been too old, improperly stored, or beginning to spoil before you made the butter. Always start with fresh, high-quality cream, keep it refrigerated, and use clean equipment throughout the process.
Why Is My Butter White Instead of Yellow?
This is one of the questions I hear most often.
Homemade goat milk butter is naturally much lighter in color than butter made from cow's milk. Goat milk contains very little beta-carotene, so the finished butter is usually white or a soft ivory color. That's completely normal and one of the things that makes goat milk butter unique.
Why Is There So Much Buttermilk?
Don't worry - that's exactly what's supposed to happen.
As the butterfat separates, the remaining liquid becomes buttermilk. The amount you end up with depends on the butterfat content of your cream. Be sure to save it instead of pouring it down the drain because it's wonderful for baking, pancakes, biscuits, and many other recipes.
Why Does My Butter Keep Leaking Water?
This usually means there is still water trapped inside the butter.
After washing the butter, continue pressing it gently with a spoon or butter paddles to remove as much moisture as possible. You'll often notice additional water collecting in the storage container during the first day or two in the refrigerator. I simply pour it off whenever I see it. Removing as much moisture as you can helps the butter keep longer and improves its texture.
Can You Overmix Homemade Butter?
Yes - but only after the butter has formed.
Once you see distinct clumps of butter floating in buttermilk, it's time to stop mixing. Continuing to blend after that point won't make better butter. In fact, it can start breaking the butter apart again and make it more difficult to wash and shape.
Don't worry if you accidentally let it run for another minute or two. It happens to all of us from time to time. Just stop the mixer, pour off the buttermilk, and continue with the washing process.
Why Is My Butter So Soft?
Homemade butter is often softer than store-bought butter, and that's perfectly normal.
The temperature of your kitchen plays a big role. On a warm summer day, fresh butter will soften much more quickly than it will during the winter. If it becomes difficult to handle, simply place it in the refrigerator for 10 to 15 minutes before continuing to wash, shape, or package it.
If your butter still seems unusually soft, there may be a little too much water remaining. Continue pressing the butter while washing it in very cold water until as much moisture as possible has been removed.
Can I Save a Batch That Didn't Turn Into Butter?
Usually, yes.
If your cream has only reached the whipped cream stage, don't throw it away. Keep blending or churning. Many first-time butter makers stop too soon because they think they've done something wrong, when in reality they're only a few minutes away from butter.
If you've been mixing for quite a while and nothing is happening, check the temperature of the cream. Extremely cold cream or cream that's become too warm can take longer to separate. Letting the cream warm slightly or chilling it a bit more, depending on the situation, is often enough to get the process moving again.
The biggest piece of advice I can give is this: don't give up too soon. Almost every batch I've thought wasn't going to work eventually turned into beautiful homemade butter with just a little more patience.
🌿 Sheri's Homestead Tip
If your first batch doesn't turn out exactly the way you hoped, don't give up. I've been making homemade butter for years, and every now and then I still have a batch that takes a little longer or behaves differently than the last one. Making butter is part science and part experience. The more you do it, the more you'll recognize the signs that tell you it's ready.
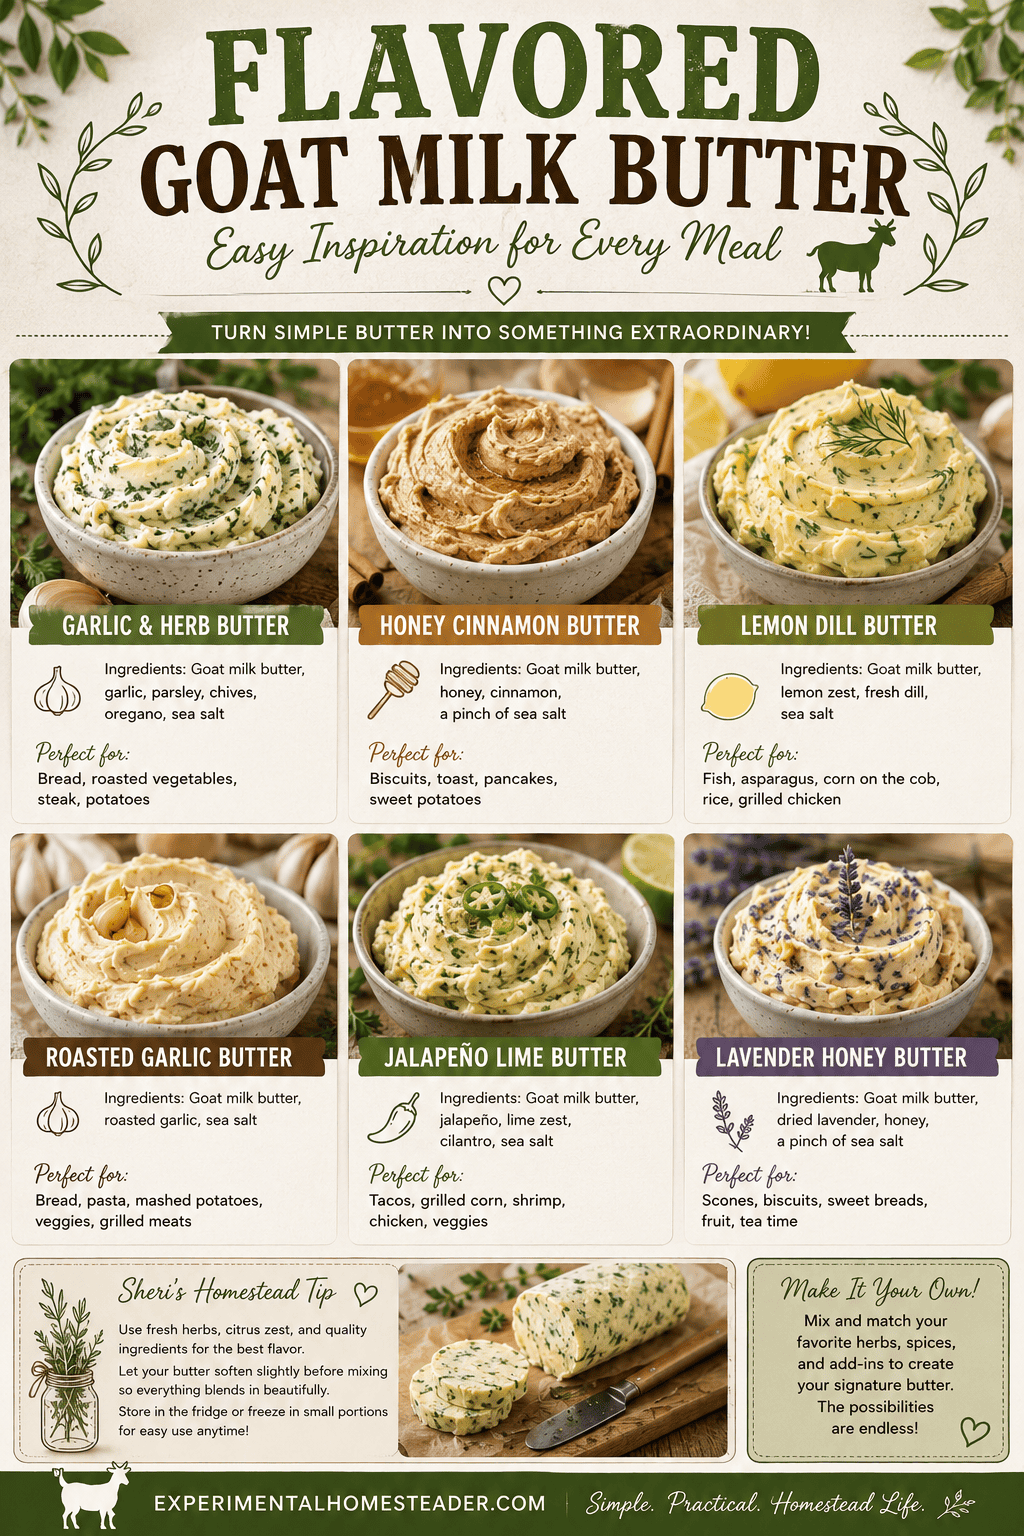
Flavor Ideas for Homemade Goat Milk Butter
One of my favorite things about making homemade goat milk butter is that it's like starting with a blank canvas. Plain butter is delicious on its own, but when the herb garden is overflowing or I have a fresh batch of maple syrup on hand, it's hard to resist creating something a little different.
I always mix flavorings into the butter after it has been washed thoroughly and most of the moisture has been pressed out. This helps the ingredients blend evenly and keeps the butter from becoming watery.
Here are some of my favorite combinations to try.
Garlic Herb Butter
Fresh garlic combined with chives, parsley, thyme, and a little sea salt creates a classic compound butter that's wonderful on steak, grilled chicken, vegetables, baked potatoes, or warm homemade bread.
Honey Butter
A little honey transforms homemade butter into a sweet spread that's perfect on biscuits, cornbread, muffins, pancakes, and waffles. It's one of the simplest flavored butters you can make.
Maple Cinnamon Butter
This is one of my family's favorites. I use my homemade maple syrup along with a sprinkle of cinnamon to create a butter that's incredible on toast, pancakes, waffles, sweet potatoes, or fresh dinner rolls.
Roasted Garlic Butter
Roasting garlic first gives it a mellow, slightly sweet flavor that blends beautifully into butter. It's perfect for garlic bread, mashed potatoes, pasta, or roasted vegetables.
Rosemary Butter
Fresh rosemary adds a rich, earthy flavor that pairs especially well with roasted chicken, turkey, pork, and potatoes.
Lavender Honey Butter
Just a touch of culinary lavender combined with honey creates an elegant butter that's delicious on homemade scones, biscuits, or shortbread. A little lavender goes a long way, so use it sparingly.
Chive Butter
Fresh chives are one of the easiest herbs to grow, and they're one of my favorite additions to homemade butter. This simple combination is perfect for baked potatoes, scrambled eggs, vegetables, or fresh bread.
Everything Bagel Butter
If your family loves everything bagel seasoning, try stirring a spoonful into softened butter. It's fantastic spread on toasted bagels, English muffins, or savory breakfast sandwiches.
Sun-Dried Tomato Butter
Finely chopped sun-dried tomatoes mixed with a little garlic and basil create a flavorful butter that's wonderful tossed with hot pasta, spread on artisan bread, or melted over grilled chicken.
Raspberry Butter
Fresh raspberries add a beautiful blush of color and a bright, fruity flavor to homemade goat milk butter. I like to mash the berries well or use seedless raspberry preserves for a smoother texture. This sweet raspberry butter is delicious spread on warm biscuits, English muffins, pancakes, waffles, or fresh homemade bread. It also makes a lovely addition to a brunch table or afternoon tea.
Hot Honey Butter
A drizzle of hot honey adds just enough sweetness and heat to make an unforgettable butter for cornbread, fried chicken, roasted sweet potatoes, or grilled corn on the cob.
Lemon Or LIme Dill Butter
Fresh dill and a little lemon zest or lime juice make a bright, refreshing butter that's perfect with fish, shrimp, asparagus, green beans, or roasted carrots.
Rose Petal Butter
Edible rose petals create a beautiful butter with a delicate floral flavor. I like serving it for afternoon tea with homemade scones or spreading it on lightly sweetened breads for special occasions.
Nasturtium Butter
Nasturtium blossoms and leaves have a mild peppery flavor that's similar to watercress. Mixed into butter, they create a colorful nasturtium butter that's delicious on crackers, sandwiches, grilled vegetables, or baked potatoes.
Create Your Own Signature Butter
Don't be afraid to experiment with the herbs, edible flowers, spices, and sweeteners you already grow or make on your homestead. Some of my favorite combinations have come from simply looking around the garden and wondering, "I wonder what this would taste like in butter?"
That's one of the joys of making food from scratch. Every batch can be a little different, and before long you'll have a few signature butter recipes that your family asks for again and again.
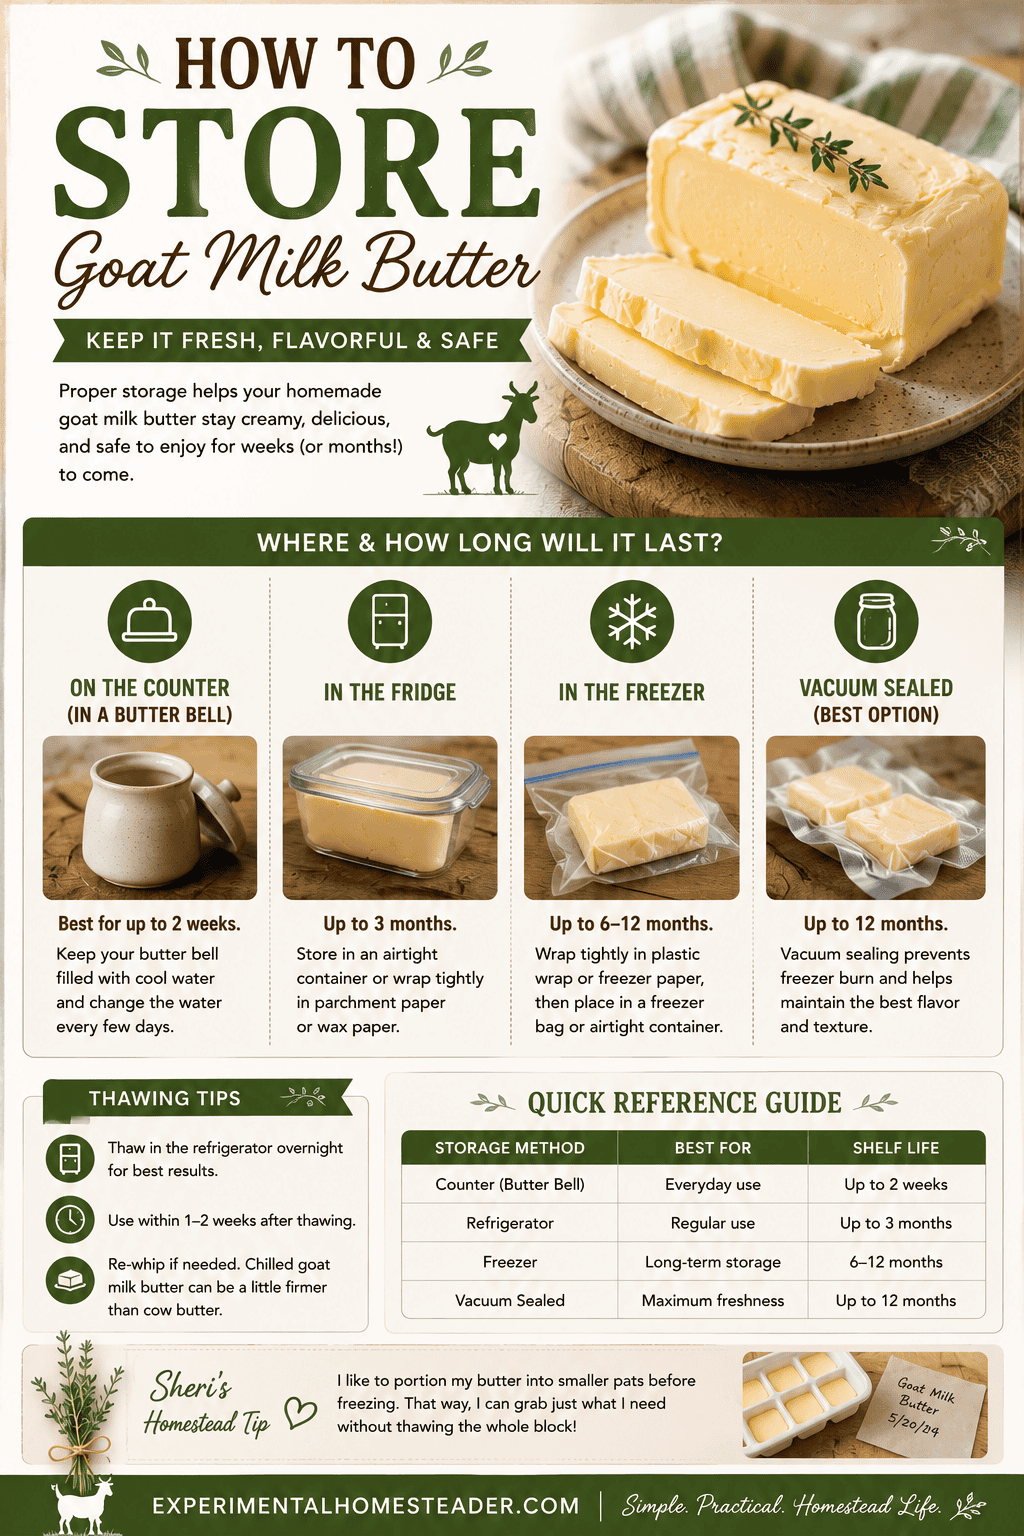
How to Store Homemade Goat Milk Butter
One of the best things about homemade goat milk butter is that it stores beautifully, whether you plan to use it over the next few days or save it for months.
For everyday use, I keep a small amount in my butter bell so it's always soft, spreadable, and ready for fresh bread, vegetables, or toast. The rest stays in the refrigerator or freezer until I need it.
If I'm freezing butter, I like to portion it before storing it. My silicone butter molds make this especially easy because they create butter sticks with tablespoon markings, just like the ones you buy at the grocery store. Smaller portions are also handy if you only need a little butter for a recipe.
Homemade butter can also be frozen in airtight containers, wrapped well in freezer paper or wax paper, or vacuum sealed to help prevent freezer burn and preserve its fresh flavor. Some people even freeze butter in ice cube trays for convenient single-serving portions that are perfect for cooking.
No matter which storage method you choose, always label your butter with the date so you can rotate older batches to the front and use them first.
Before using stored butter, give it a quick look and smell. Fresh butter should have a clean, pleasant dairy aroma. If it develops an off odor, mold, or any signs of spoilage, it's best to discard it.
If you're interested in preserving more of your fresh dairy products, be sure to check out my articles on How to Freeze Goat Milk and How to Freeze-Dry Goat Milk. Both methods have helped me make the most of the milk my goats produce, ensuring I always have goat milk on hand for cooking, baking, and everyday use.
Don't Throw Away the Buttermilk!
After your butter separates, you'll be left with a bowl of liquid called buttermilk. Before you pour it down the drain, stop!
That fresh buttermilk is far too useful to waste.
One thing that's important to understand is that homemade buttermilk isn't quite the same as the cultured buttermilk you buy at the grocery store. The liquid left behind after making butter from fresh cream is often called traditional buttermilk or sweet buttermilk. It's thinner, milder, and doesn't have the tangy flavor of commercially cultured buttermilk, but it's still a wonderful ingredient in the kitchen.
I try to use every part of the milk my goats produce, and the leftover buttermilk is no exception.
Bake With It
Homemade buttermilk adds moisture to baked goods and is a great substitute for milk in many recipes.
Some of my favorite ways to use it include:
- Homemade biscuits
- Pancakes
- Waffles
- Quick breads
- Muffins
- Cornbread
The flavor is mild, so it works beautifully in recipes where you simply want a tender crumb and a little extra richness.
Make Creamy Mashed Potatoes
Instead of adding regular milk, stir a little homemade buttermilk into mashed potatoes. It creates a creamy texture while adding just a touch more flavor without making the potatoes heavy.
Add It to Homemade Soup
Traditional buttermilk can also be stirred into creamy soups right before serving. It adds richness without requiring heavy cream and is a great way to use up every last drop.
Use It in Marinades
The natural proteins in buttermilk make it an excellent marinade for chicken, pork, and other meats. Although homemade sweet buttermilk isn't as acidic as cultured buttermilk, it still helps keep meat moist while allowing herbs and seasonings to penetrate.
Make Homemade Biscuits and Gravy
Fresh homemade biscuits topped with sausage gravy are one of my family's comfort foods. I often use leftover buttermilk in both the biscuits and the gravy instead of letting it go to waste.
Share It With Your Chickens
If I have more buttermilk than I can use, I don't throw it away. My chickens enjoy it as an occasional treat, and it helps ensure that none of the goodness from the milk goes to waste.
Freeze It for Later
If you don't have an immediate use for your buttermilk, freeze it in recipe-sized portions. Ice cube trays, silicone molds, or small freezer containers work well, making it easy to thaw only what you need for your next baking project.
One of the things I love most about homesteading is learning to use every part of what we produce. Fresh butter is wonderful, but knowing the leftover buttermilk can become tomorrow's biscuits, pancakes, or soup makes the entire process even more rewarding.
Goat Milk Butter Questions Answered
Can You Make Butter From Goat Milk?
Yes! Goat milk can absolutely be turned into butter. The biggest challenge isn't making the butter - it's collecting enough cream. Once you have enough cream, the process is much the same as making butter from cow's milk. Whether you skim the cream by hand or use a cream separator, you'll end up with rich, creamy homemade butter.
Why Is My Goat Milk Butter White?
Homemade goat milk butter is naturally white or a soft ivory color because goat milk contains very little beta-carotene. Unlike many commercial butters, I don't add food coloring, so the finished butter reflects its natural color.
How Much Cream Does It Take to Make One Pound of Butter?
As a general guideline, about 4 cups of heavy cream will produce approximately 1 pound of butter, but don't expect every batch to be identical. Butter yield depends on the butterfat content of the cream, which can vary by breed, season, diet, and even from one doe to another.
Can I Freeze Homemade Goat Milk Butter?
Absolutely! Homemade goat milk butter freezes very well. I like to portion it into butter-stick molds before freezing so it's ready to use for cooking and baking. Just wrap it well or store it in an airtight container to help prevent freezer burn.
Is Goat Milk Butter Healthier Than Butter Made From Cow's Milk?
Both goat milk butter and cow's milk butter contain many of the same nutrients, but their fat composition is slightly different. Some people find goat milk products easier to digest, although everyone's experience is different. If you have dietary concerns, it's always best to talk with your healthcare provider.
Can I Use Pasteurized Goat Milk?
Yes. Homemade butter can be made from either raw or pasteurized goat milk. The important thing is using fresh, good-quality cream. Once you've collected the cream, the butter-making process is the same.
Why Won't My Cream Turn Into Butter?
Usually, it just needs more time. The cream first becomes whipped cream before it separates into butter and buttermilk. If your cream seems stuck at the whipped cream stage, keep blending or churning. Also make sure the cream isn't too warm or too cold, as temperature can affect how quickly butter forms.
Do I Need a Butter Churn?
Not at all. I made my first batches in a blender, and today I often use my KitchenAid stand mixer. A butter churn is fun to use, especially if you enjoy traditional homesteading skills, but it's certainly not required to make delicious homemade butter.
Can I Salt Homemade Butter?
Yes. Salt is completely optional. I usually add a little sea salt because it enhances the flavor and helps remove a bit more moisture from the butter. If I'm making butter specifically for baking, I often leave it unsalted so I can control the salt in my recipes.
How Long Does Homemade Goat Milk Butter Last?
Homemade butter generally keeps for about a week in the refrigerator when properly washed and stored. For longer storage, freeze it in airtight containers or well-wrapped portions. Before using stored butter, always check for any off odors, mold, or other signs of spoilage.
More Goat Milk Recipes & Guides
One of the things I love most about raising dairy goats is discovering new ways to use every drop of milk they produce. Butter is just the beginning.
If you're working your way through using every drop of fresh goat milk, you'll also enjoy these articles:
- The Ultimate Guide to Goat Milk
- How to Pasteurize Goat Milk at Home
- How Long Does Pasteurized Goat Milk Last?
- How to Separate Goat Milk Cream
- Goat Milk Storage Ideas
- How to Freeze Goat Milk
- How to Freeze-Dry Goat Milk
- Easy Homemade Goat Milk Cheese
- How to Make Goat Milk Cottage Cheese
- Easy Homemade Parmesan Cheese
- How to Make Cajeta (Goat Milk Caramel)
- Pecan-Crusted Goat Cheese Appetizer
- Basic Goat Milk Soap Recipe
- Goat Milk Soap Recipes Round-Up
Each one has helped me make better use of the milk my goats produce, and I hope they'll help you do the same.
Coming Soon: The Goat Milk Kitchen Toolkit
The more I write about goat milk and homemade dairy products, the more I realize there are so many little notes, charts, and worksheets I wish I'd had when I first started milking goats.
That's why I'm creating the Goat Milk Kitchen Toolkit - a printable collection designed to help you stay organized and make the most of every gallon of milk your goats produce.
It will include printable resources such as:
- Butter yield tracker
- Dairy production log
- Cream collection tracker
- Butter flavor recipe cards
- Freezer inventory labels
- Goat milk conversion charts
- Shelf-life reference guides
- Dairy inventory worksheets
- Printable kitchen reference sheets
- Cheese and butter quick-reference guides
If that sounds like something you'd enjoy, be sure to join my email newsletter. Subscribers will be the first to hear when the Goat Milk Kitchen Toolkit is finished, along with new goat milk recipes, homesteading tips, and printable resources.
🧈 Coming Soon: The Goat Milk Kitchen Toolkit
I'm creating the printable resource I wish I'd had when I first started milking goats. It will include butter yield trackers, cream collection logs, freezer inventory labels, recipe cards, dairy planners, conversion charts, and quick-reference guides to help you make the most of every drop of fresh goat milk.
Join my newsletter and you'll be the first to know when the toolkit launches - plus you'll receive new goat milk recipes, homesteading tutorials, and exclusive subscriber-only resources.
I'd Love to Hear From You
I hope this goat milk butter recipe inspires you to give homemade butter a try. It's one of those homesteading skills that seems a little magical the first time you watch fresh cream transform into butter. Before long, you'll probably find yourself looking for excuses to make another batch.
Every homestead is different, and that's one of the things I love most about this lifestyle. The butter you make may look a little different than mine, your favorite flavor combinations may not be the same as mine, and that's exactly how it should be. That's part of the joy of learning to work with what your own goats provide.
Have you made homemade goat milk butter before? I'd love to know how you do it. Do you use a blender, a KitchenAid stand mixer, a butter churn, or another method? Have you discovered a favorite herb, spice, or sweet flavor combination that your family loves?
Leave a comment below and share your experience. Your ideas and tips might be exactly what another reader needs to gain the confidence to make their first batch of homemade goat milk butter.