Easy Halloween Cookies to Make with Kids
Are you on the hunt for easy Halloween cookies that are both fun to make and delicious to eat?

The Halloween season is upon us, and you're itching to create something spooktacular, memorable, and, most importantly, hassle-free.
As a homesteader with a plate full of chores, baking from scratch might not be on the agenda.
But fear not!
We've got a delightful solution that's not only easy but also a fantastic activity for the whole family: decorating prepackaged cookies with a spooky twist.
If you're seeking a way to celebrate this holiday without the fuss, you're in the right place.
Easy Halloween cookies don't get much simpler than this.
Little Debbie's Oatmeal Creme Pies are about to undergo a transformation using craft supplies like construction paper, googly eyes, raffia, and sharpie markers.
Trust me; you don't need to be a cookie decorating pro to make these treats look amazing.
Little Debbie Magic: Transforming Oatmeal Creme Pies into Spooky Delights
Let's talk about the magical transformation of humble Little Debbie's Oatmeal Creme Pies into spooky, creative delights.
If you've got a stash of prepackaged treats like these, you're in for a delightful adventure that will have your family and friends applauding your creative prowess.
Start by gathering your craft supplies: construction paper, googly eyes, raffia, and sharpie markers.
These unassuming items are about to become your tools for crafting cookies that will steal the spotlight at any Halloween gathering.
The best part?
You don't need to be a cookie decorating pro to make these treats look utterly amazing.
With Little Debbie's Oatmeal Creme Pies as your canvas, you have the perfect foundation for your Halloween cookie artistry.
These delectable treats already come with a delicious creme filling that adds a delightful dimension to your creations.
The soft, chewy cookies are a perfect base, ensuring that your spooky decorations not only look good but taste fantastic too.
Now, let your imagination run wild.
Use construction paper to create witches' hats, ghostly faces, or pumpkin shapes.
Stick on googly eyes to give your cookies a mischievous or spooky gaze.
The raffia can be transformed into creepy spiderwebs or whimsical pumpkin vines.
And with sharpie markers, you can add details, like eerie smiles or intricate designs.
The beauty of this creative adventure is that it's accessible to everyone, regardless of their decorating skills.
It's a fantastic family activity, perfect for getting kids involved and fostering their artistic talents.
So, if you thought you needed to be a seasoned baker or an expert decorator to make show-stopping Halloween cookies, think again.
Little Debbie's Oatmeal Creme Pies and your craft supplies are all you need to embark on a memorable and delicious Halloween cookie decorating journey.
A Recipe for Memories: Family Fun with Halloween Cookies
Halloween is a time for more than just trick-or-treating and costume parades; it's an opportunity to create cherished memories.
Getting your family involved in the craft of decorating Halloween cookies can be an experience they'll remember for years to come.
Whether your kids are budding artists or simply excited about some spooky fun, this activity offers the perfect opportunity for bonding.
It's a chance to share good old-fashioned fun with your little ones and teach them the joy of getting creative in the kitchen.
Imagine a table set with prepackaged cookies, colorful craft supplies, and eager faces.
Little hands carefully placing googly eyes on their creations, laughter filling the room as everyone competes to design the spookiest or funniest cookie.
These are the moments that form the heartwarming memories your family will cherish.
The Versatility of Prepackaged Cookies
Homesteading life can be hectic, and not everyone has the time or the baking skills to make cookies from scratch.
That's where prepackaged cookies come to the rescue.
While baking from scratch has its charm, there's a unique convenience in having pre-made cookies ready for your artistic touch.
These treats are like blank canvases, waiting for your creativity to transform them into Halloween masterpieces.
The versatility of prepackaged cookies is impressive.
Their uniformity provides a consistent canvas for your decorations.
You don't have to worry about cookie shapes or sizes; you can focus solely on the fun part - decorating.
This convenience makes them an ideal choice for anyone, regardless of their baking expertise.
Ready When You Are: Make-Ahead Halloween Cookies
One of the delightful perks of decorating prepackaged cookies is that you can prepare them in advance.
Store them securely until the perfect moment arrives.
When Halloween night descends, and little ghouls and goblins come knocking on your door, you'll be well-prepared to offer them a spooky, delicious treat.
Picture the delight on their faces as they receive these creatively adorned cookies.
It's a gesture that can make your house the favorite stop on the trick-or-treat route.
The joy of seeing kids' faces light up when they receive these homemade yet hassle-free treats is a memory in the making.
Print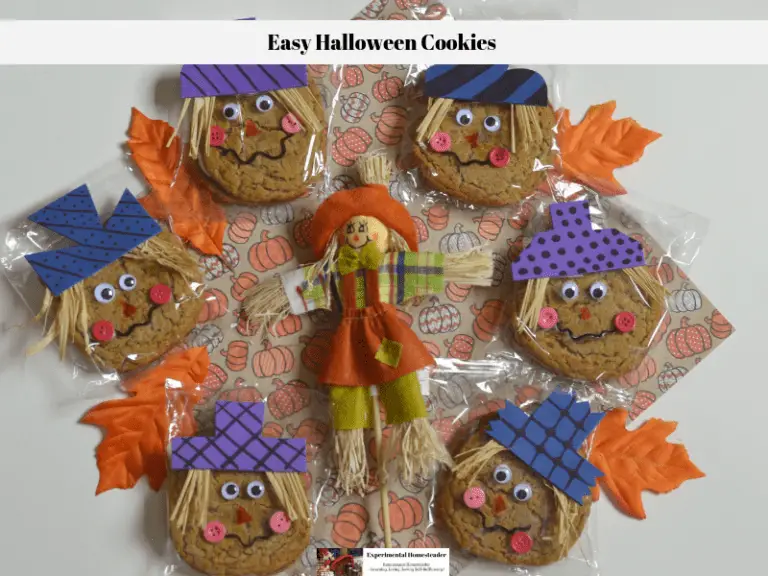
Easy Halloween Cookies
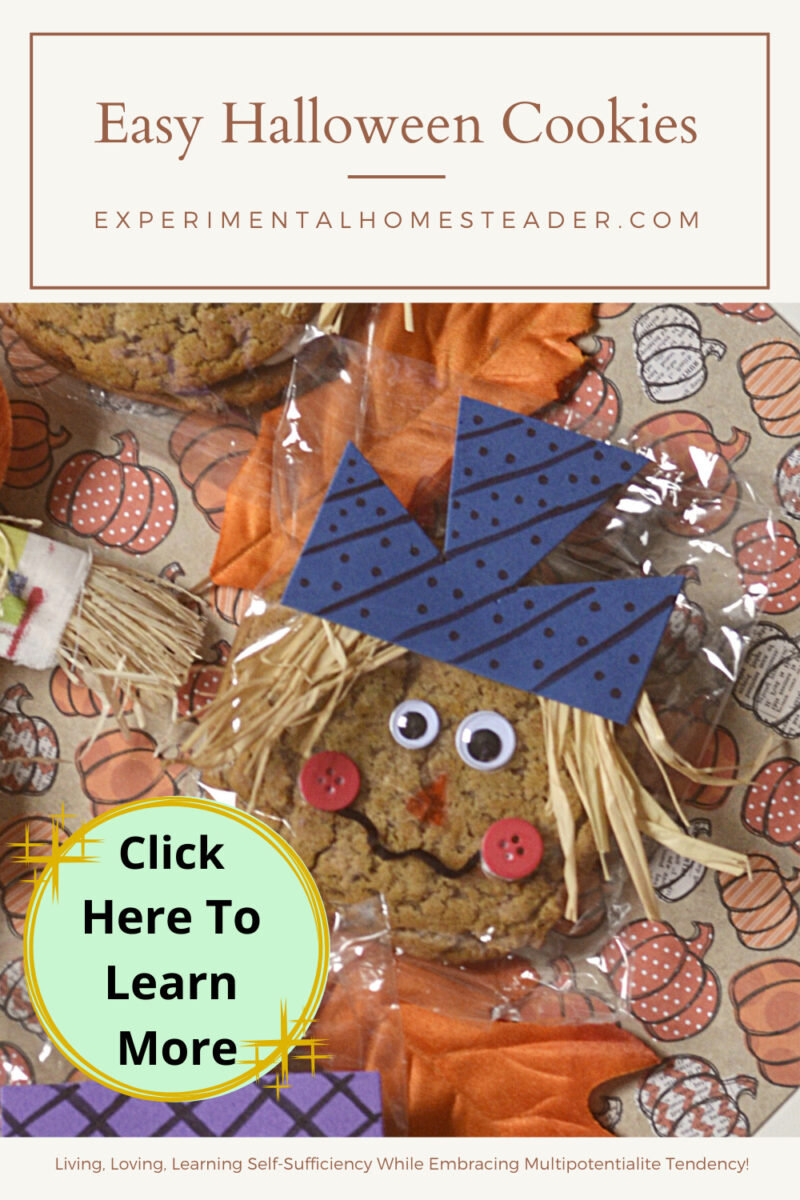
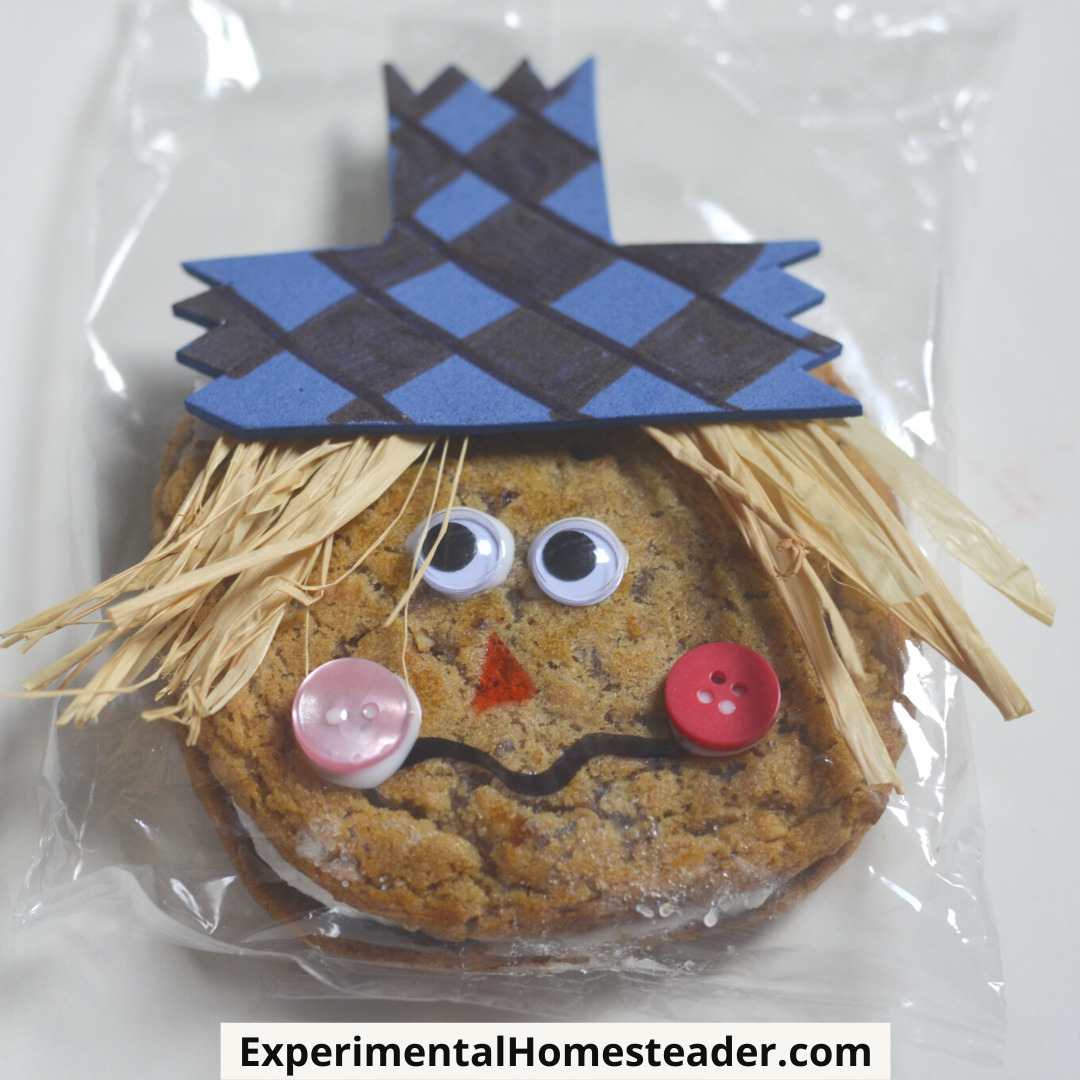
These cute decorated oatmeal creme pie scarecrows are an ideal way to add a festive holiday feel to store bought cookies. They are perfect for Halloween, Thanksgiving or any fall event.
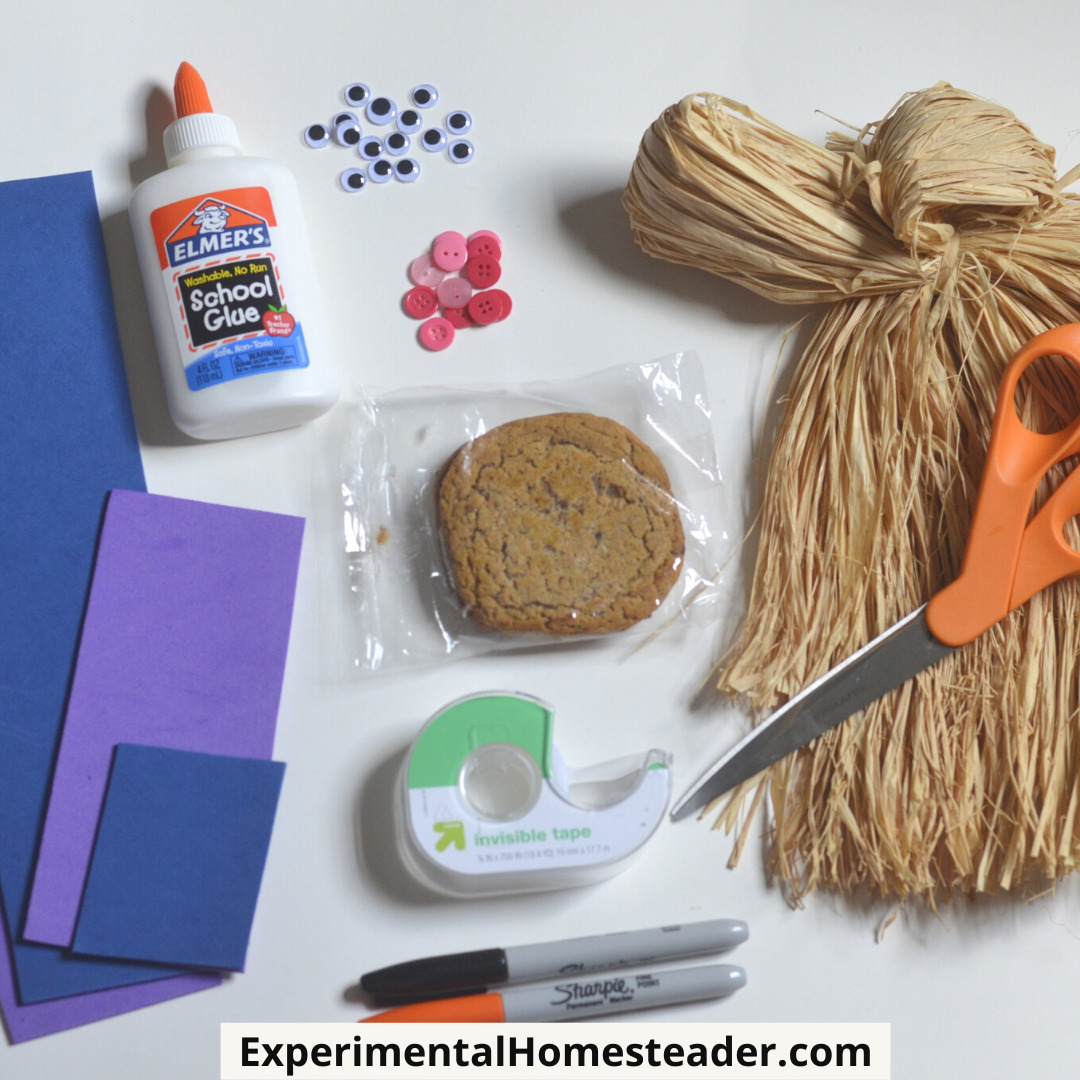
Ingredients
- Little Debbie Oatmeal Creme Pies (I used the large ones, but the small ones work too.)
- Crafting Foam or Construction Paper
- Raffia
- Googly Eyes
- Buttons
- Scissors
- Crafters tape
- Elmer's Clear Glue
- Black Sharpie
- Orange Sharpie
Instructions
- Gather your supplies.

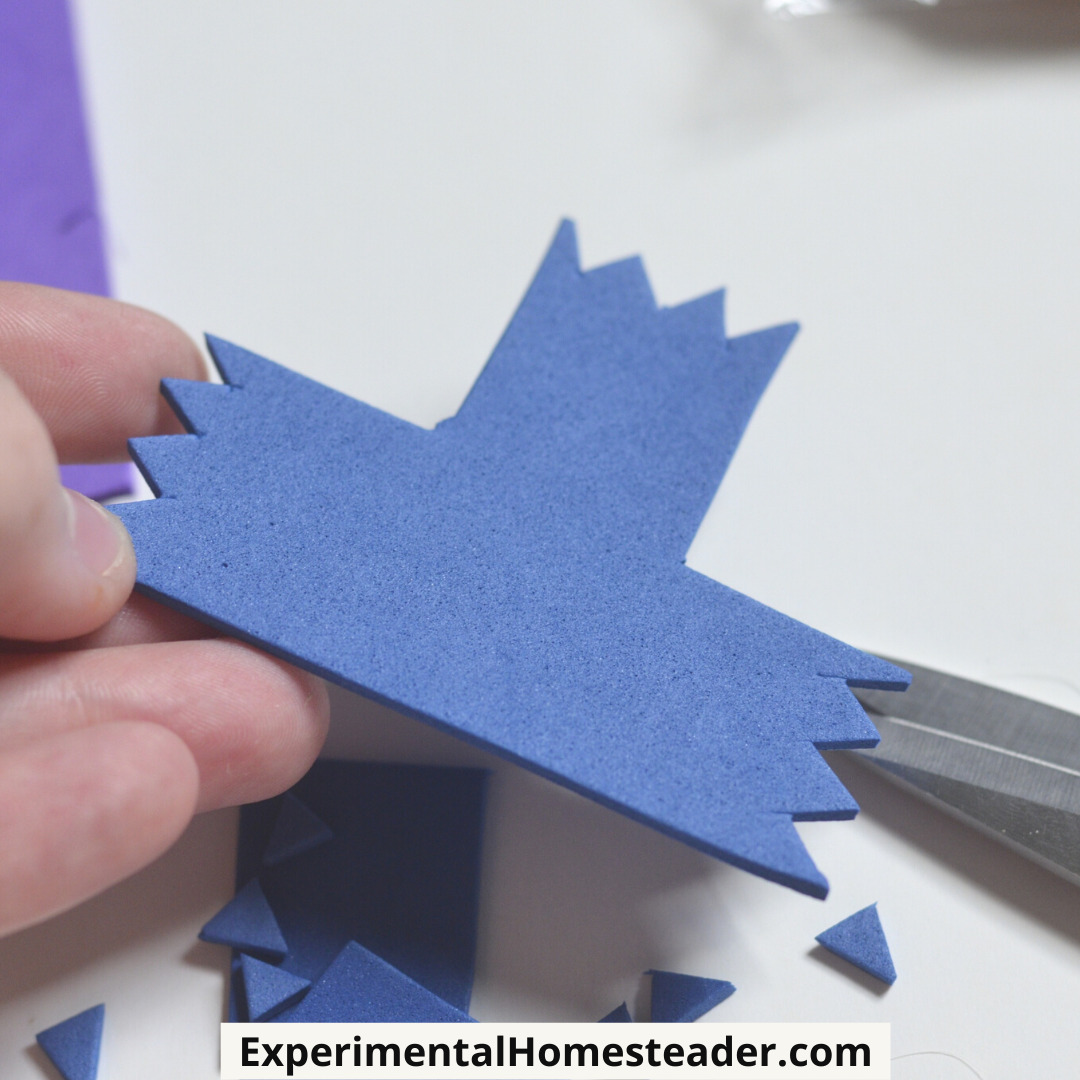
- Cut out a hat using the crafting foam or construction paper.
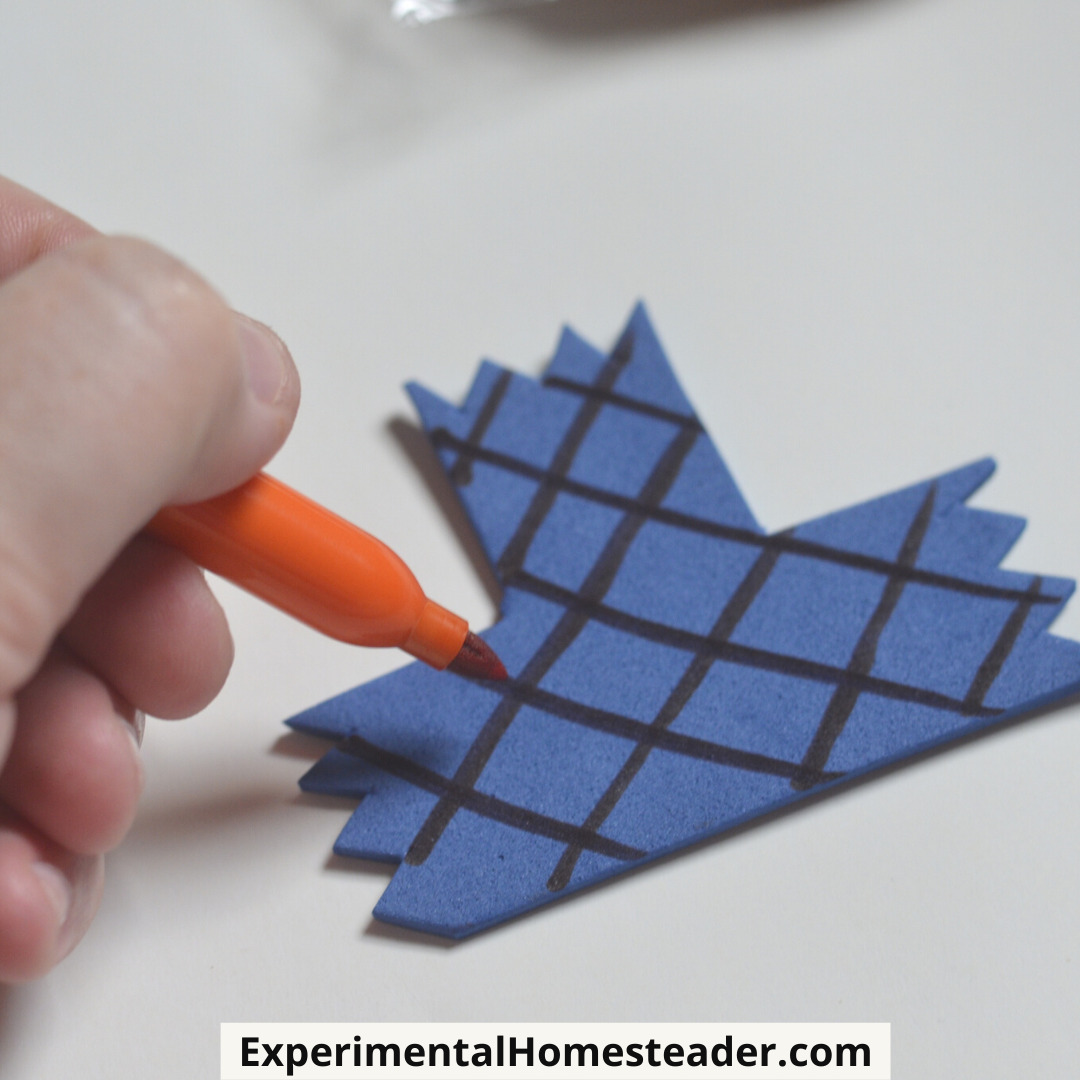
- Decorate the front with some type of design using the Sharpies. Get creative with the shapes and try varying designs.
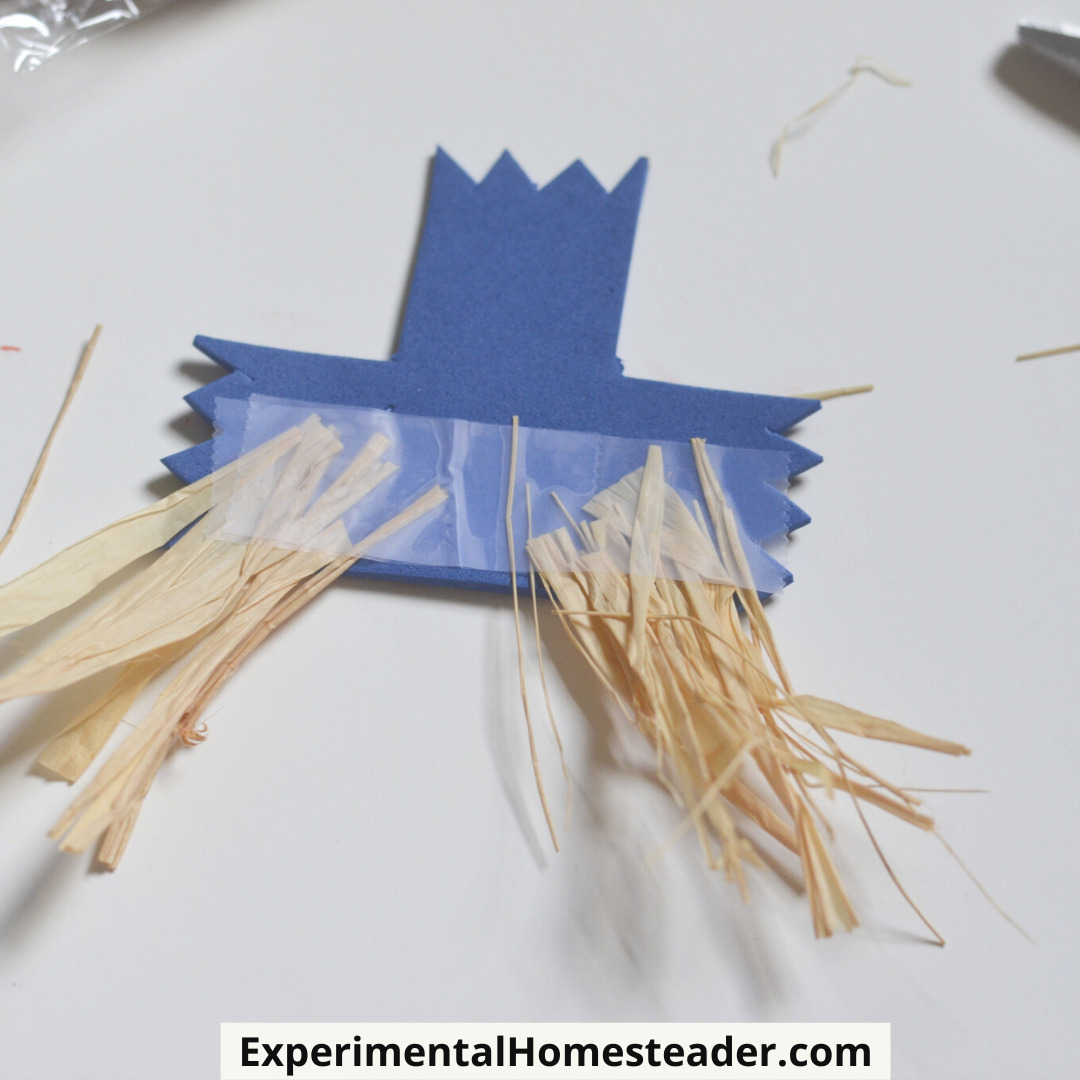
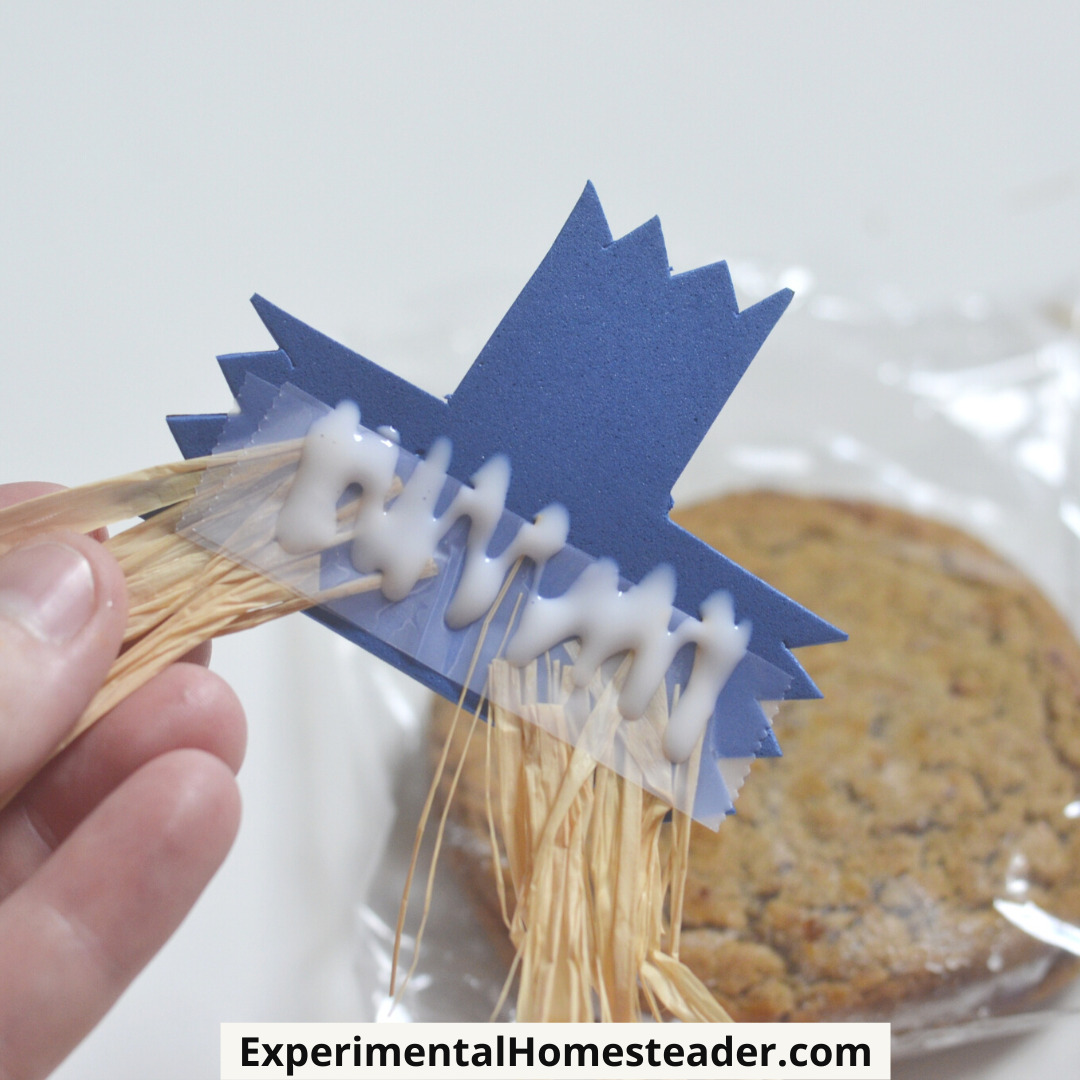
- Cut the raffia in lengths of 1 ½ to 2 inches to use for the scarecrow’s hair.
- Tape the raffia to either side of the back of the hat.
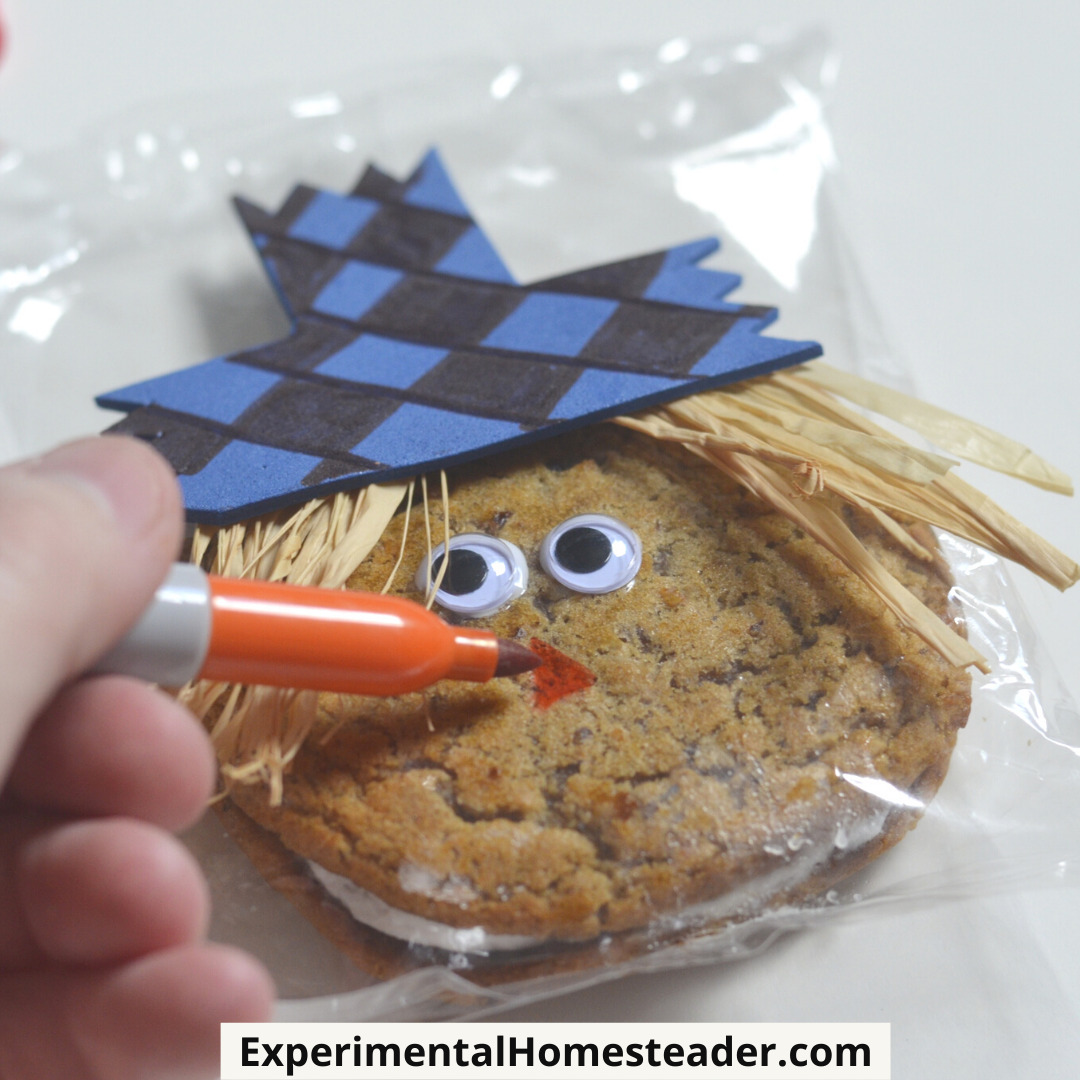
- Glue the hat to the front of the oatmeal crème pie package. There is a packaging seam on the back, so it’s easy to figure out which side is the front.
- Glue on the googly eyes.
- Draw a triangular nose on the packaging using the orange Sharpie. You may have to go over the triangle with the marker 2-3 times so that it shows up well.
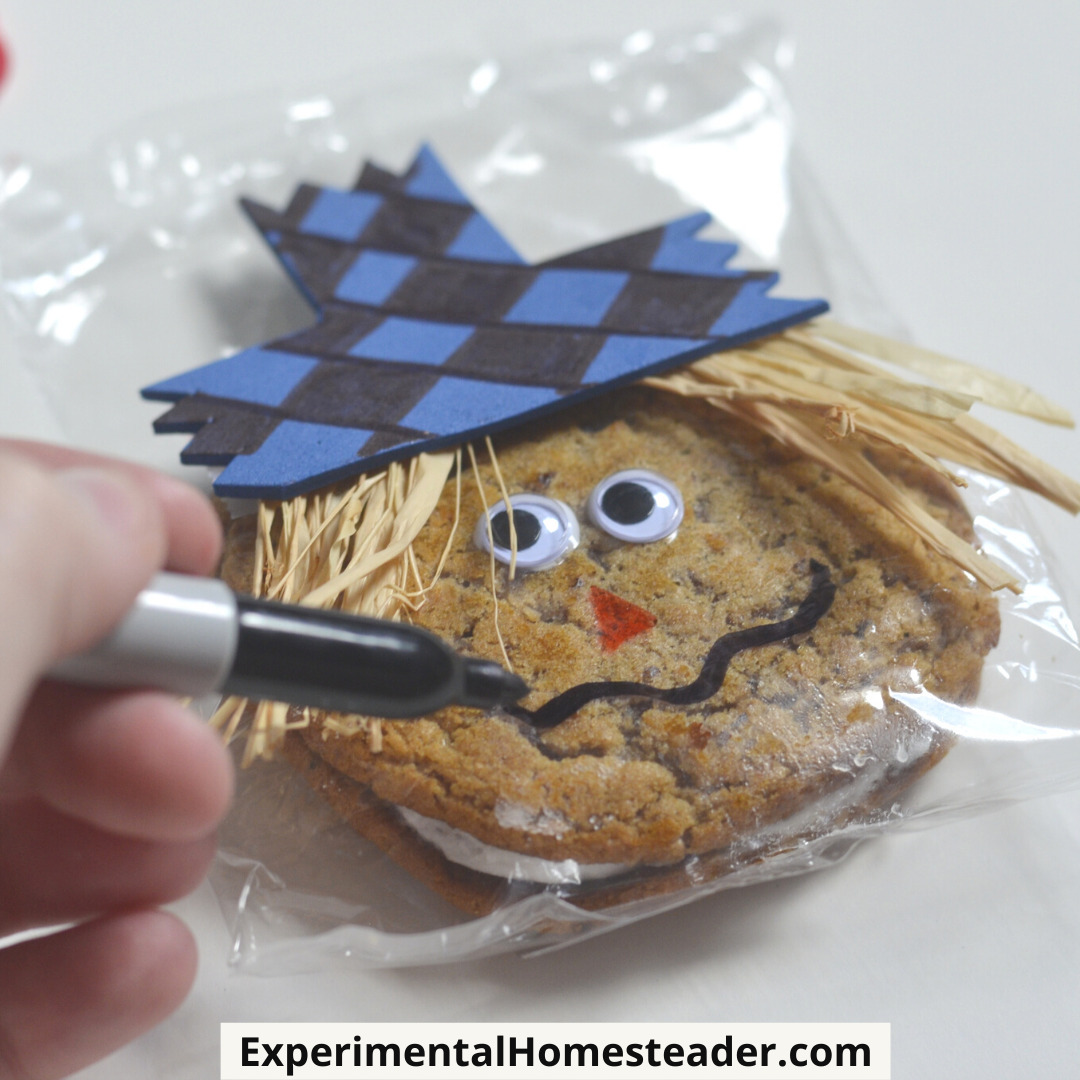
- Draw the scarecrow's mouth using the black Sharpie.
- Glue on the button cheeks.
- Set the oatmeal creme pies aside and let everything dry for at least an hour. Overnight is even better.


Notes
Note: When gluing on the hat, I recommend holding the cookie package upright so that the cookie falls to the bottom of the package. Then glue the hat on. If you don’t do this, when someone picks up the cookie, the hat and other features may not line up well with the cookie and it won’t look right.

Thinking Beyond Cookies: Creative Possibilities
When you've mastered the art of decorating prepackaged cookies, don't stop there.
Think beyond cookies; envision an array of transparent packaging, each waiting to be transformed into a Halloween delight.
Brownies, cupcakes, and more - they're all fair game for your creative touch.
This opens up the possibility of sending your child to school with a creatively adorned treat while meeting the school's requirement of store-bought items in their original packaging.
Consider the possibilities: cupcakes adorned with witches' hats and pumpkin patches, or brownies transformed into friendly ghosts and goblins.
The flexibility of this creative endeavor knows no bounds.
Involving the Little Ones: A Family Affair
This project isn't reserved for adults alone; it's a fantastic opportunity to get the whole family involved.
While some aspects, like gluing, might require adult supervision, there's a plethora of creative tasks that are tailor-made for little hands.
Let the kids take the lead in cutting out spooky shapes, drawing their unique designs, and decorating the prepackaged cookies.
The benefits of involving your children in this Halloween cookie decorating extravaganza are numerous.
Firstly, it's a fun and engaging activity that keeps them entertained while learning valuable skills.
As they cut, draw, and assemble, their creative juices will flow freely, and their imaginations will run wild.
Moreover, this shared experience is an excellent way to nurture their creativity and resourcefulness.
It encourages them to think outside the box, experimenting with different designs, colors, and themes.
It's a hands-on lesson in problem-solving and self-expression, all while having a blast in the process.
These moments spent together in the kitchen can be a treasure trove of family memories.
As you guide them in the art of cookie decorating, you're not just creating Halloween treats; you're building bonds that will last a lifetime.
These little artists will take immense pride in their Halloween masterpieces, and every year when Halloween rolls around, they'll remember the joy of creating those spooktacular cookies with their family.
Final Haunting Thoughts
As we conclude this delightful journey into easy Halloween cookie decorating, we hope your creative spirit is ablaze with inspiration.
These treats aren't solely for home enjoyment; they can also become fantastic giveaways for the little visitors on Halloween night.
Now, it's your turn to embark on your creative adventure, armed with Little Debbie's Oatmeal Creme Pies and a box of craft supplies.
The canvas is ready, and the possibilities are endless.
Share your Halloween cookie creations using this technique.
We'd be absolutely thrilled to see your artistry and hear the stories behind your unique designs.
Feel free to share in the comments below - after all, Halloween is all about sharing the spooktacular fun and making memories that will last a lifetime.
Your creations are more than just cookies; they're pieces of your heart and soul, and we can't wait to celebrate them with you.
Halloween Treats
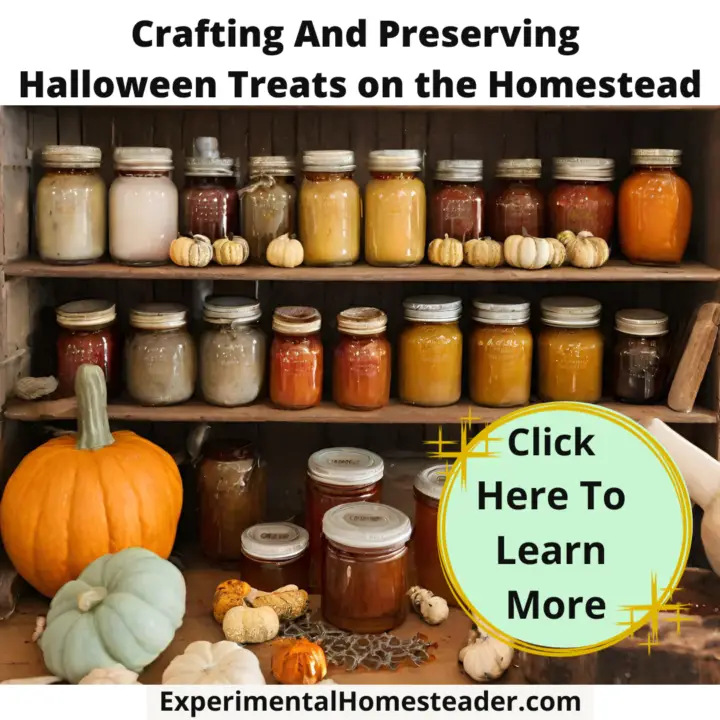
Crafting And Preserving Halloween Treats on the Homestead
Experience the joy of Canning and Preserving Halloween Treats and crafting DIY spices on the Homestead. A creative harvest adventure awaits!
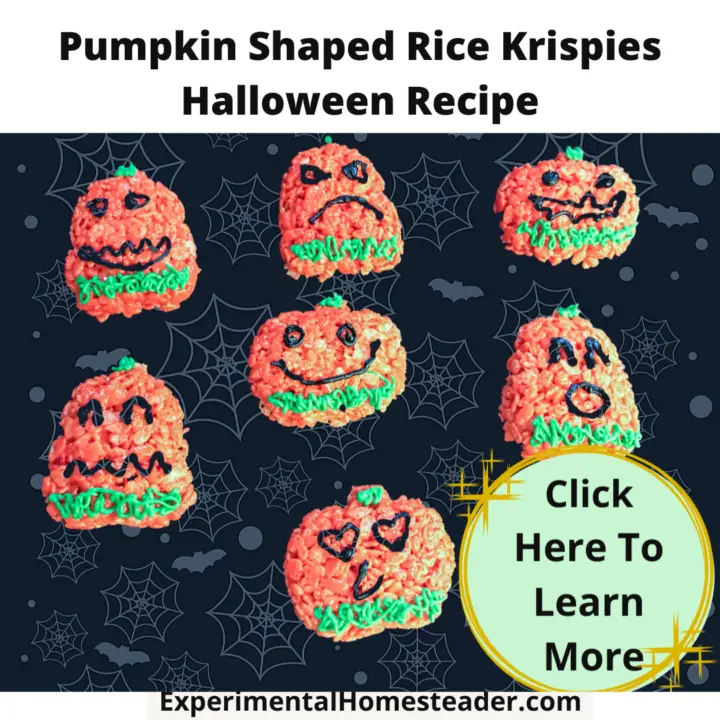
Pumpkin Shaped Rice Krispies Halloween Recipe
When it comes to easy recipes for kids that grown-ups are sure to love, this pumpkin shaped Rice Krispies Halloween Recipe is perfect!
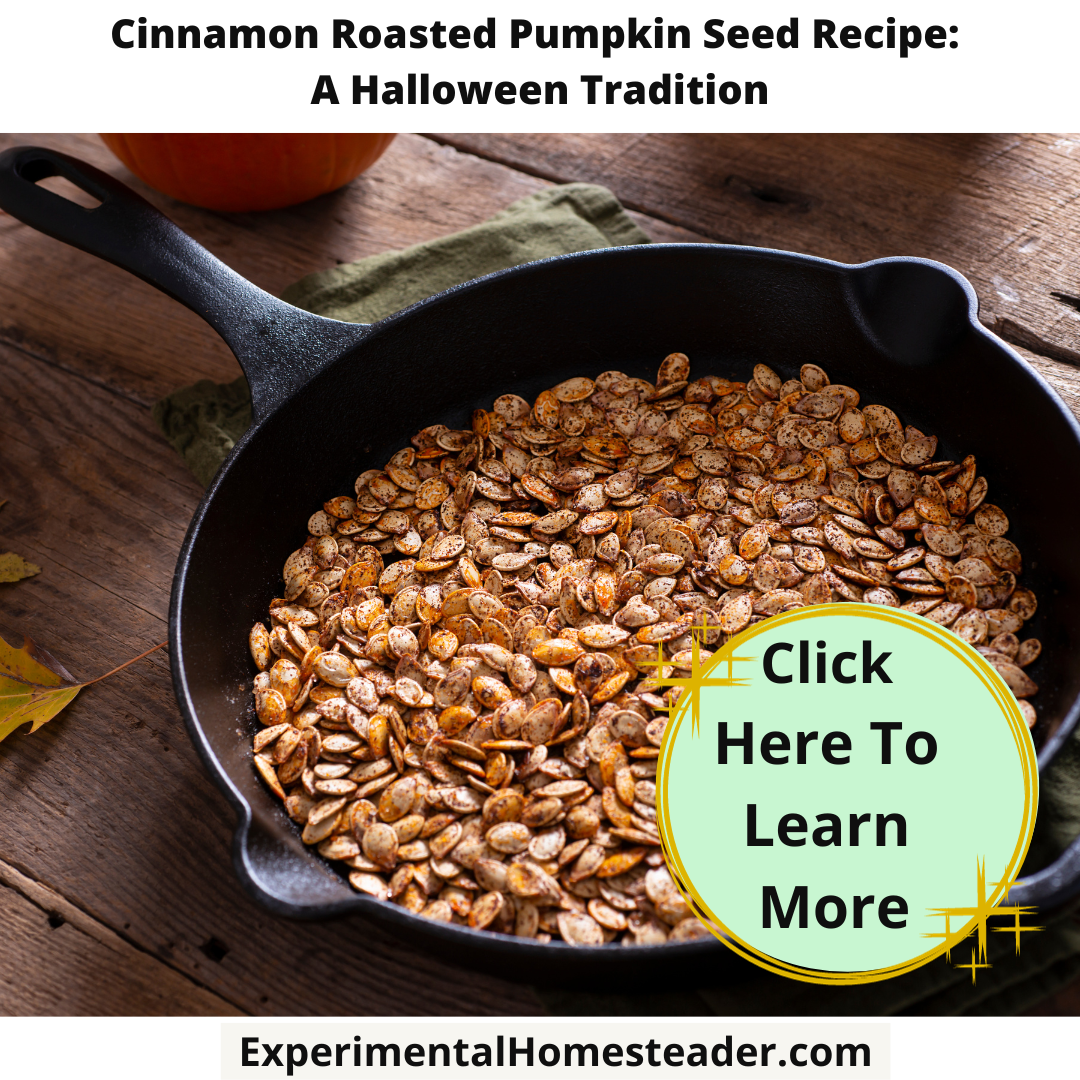
Cinnamon Roasted Pumpkin Seed Recipe: A Halloween Tradition
Celebrate Halloween with our delicious roasted pumpkin seed recipe! Discover creative seasonings for a tasty farm-style treat.
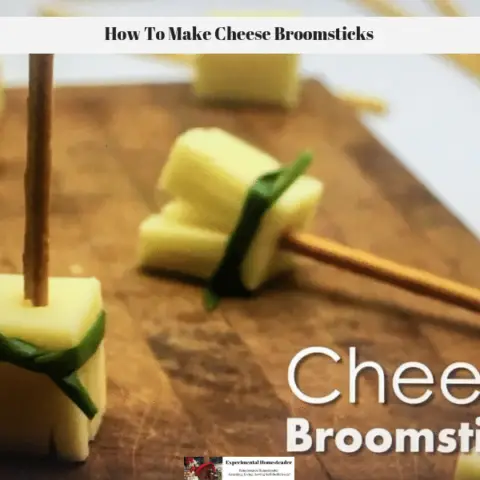
How To Make Cheese Broomsticks
These cheese broomsticks are delicious plus they are quick and easy to make. They are a perfect snack or appetizer for your Halloween Party.