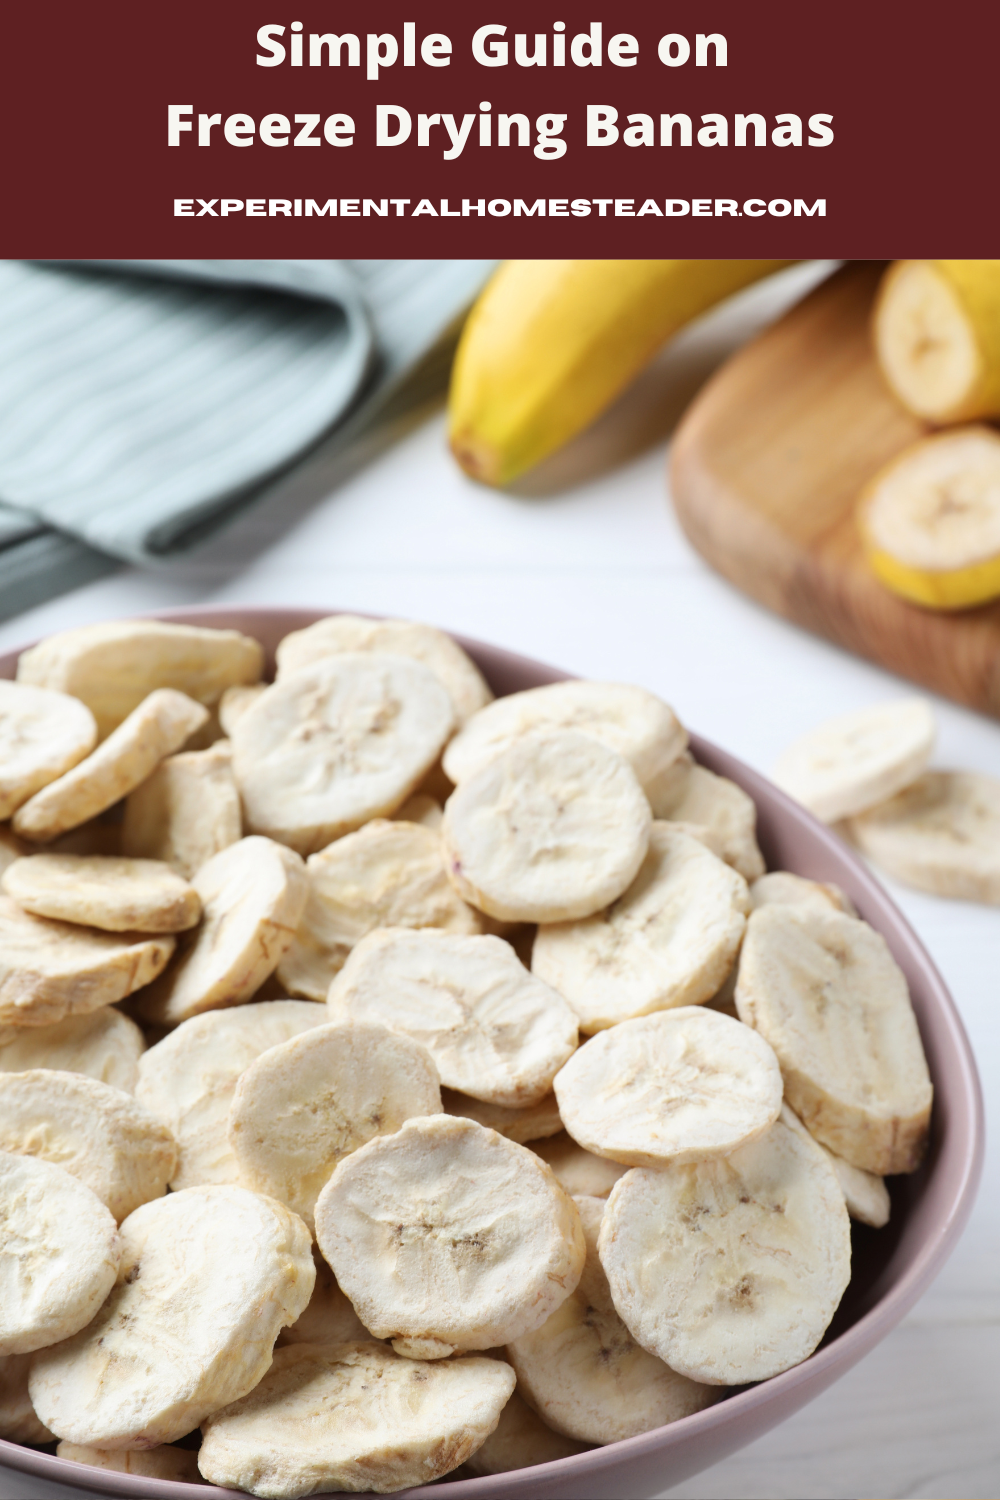
Simple Guide on Freeze Drying Bananas
Have you ever pondered the magic behind those deliciously crunchy banana chips that seem to stay fresh forever in your snack stash?

Well, fellow homesteaders, let's take a journey into the world of freeze drying bananas, a technique that's almost like something out of a sci-fi novel.
It's the key to preserving your favorite yellow fruit, keeping all those nutrients intact, and savoring them months, even years, down the road.
In this exploration, we're going to peel back the curtain on the incredible science of freeze drying.
We'll start by getting up close and personal with bananas, from their enticing peels to their nutritious core.
You will learn how to prepare them for the freeze drying process, mastering the art of cleaning, slicing, and preventing any premature browning.
But that's not all!
We'll also demystify the inner workings of a freeze dryer.
It's a piece of equipment that might look a bit intimidating at first, but we'll break it down so you can confidently freeze dry your bananas at home.
And, of course, we'll dive into the crucial topic of storing freeze-dried bananas safely to ensure their long-lasting deliciousness.
So, if you're as intrigued as I was when I first delved into the world of freeze drying, keep reading.
It's a fascinating journey that not only keeps your homestead pantry stocked but also adds a touch of science to your everyday life.
Plus, it's a fantastic way to make your homesteading adventures even more self-sufficient and enjoyable!

Understanding Freeze Drying
Once we start deep diving into all things to do with food preservation, it naturally leads to one curious and fascinating stop: freeze-drying.
While some might associate this term primarily with astronaut food or instant coffee, its usage and significance reach far beyond this initial conception.
From preserving the panoramic feast of flavors to gifting produce an almost eternal lifespan, the process of freeze drying can be nothing short of magical when explored from a food connoisseur's perspective.
The Core of Freeze Drying
To understand the enchanting process of freeze-drying, we must peel back the layers and discover its origins.
Originally born during World War II to preserve medical supplies, freeze-drying later found its glory in the food industry.
It unfolds in three vital stages: freezing, primary drying, and secondary drying.
Stage 1: The Deep Freeze
During the first stage, the food is frozen solid.
It's essential not to miss the point; super-low temperatures are the secret here.
This step ensures that the original structure and characteristics of the food remain intact, safeguarding its taste, color, and nutritional content with the poise of a maître d'.
Stage 2: The Primary Dance
Transitioning towards the second stage, we are introduced to the practice of primary drying.
A vacuum is created around the frozen food and just enough heat is introduced.
The warming causes the ice within the food to sublime; that is, the ice transforms directly into water vapor without passing through the liquid stage.
Stage 3: Conquering Residual Moisture
Lasty, residual water content - often overlooked but never underestimated - is the target of our third stage, the secondary drying.
This part extracts any lingering moisture, solidifying the freeze-dried food's impressively long shelf-life.
The Beauty of Freeze-Drying
This impeccable process leads to remarkable results, making freeze-drying a beloved tool for those who see food as more than sustenance.
From culinary professionals to home-cooks exploring innovative cooking landscapes, the benefits are savored universally.
A Gift of Longevity
Key among these is the preservation of taste, nutrients and color that is unparallel in traditional food preservation methods.
Freeze drying locks in the authentic aroma and flavors, freezing a moment in time, if you will, while keeping the food's nutritional content quite high.
Another remarkable perk - freeze-dried foods are eternally gifted with an astonishingly long shelf-life.
Once freeze-dried, foods can last for more than 25 years when packed and stored correctly.
They also become impressively light, boosting their popularity as go-to options for backpackers or anyone needing portable nourishment.
Freeze-drying might initially seem futuristic and complex, but it's profoundly simple at its core.
It's an extraordinary method that blends science and culinary art to offer a world of benefits, from sustaining the food's nutritional value to drastically extending its lifespan.
It's also a remarkable method that combines science and the art of homesteading to offer a world of benefits.
Whether you're savoring the stability of your spices' flavor profiles or marveling at the long-lasting goodness of freeze-dried veggies in your homemade soup, embracing the magic of freeze-drying is an adventure every passionate homesteader should undertake on their culinary and self-sufficient journey.
Getting Your Bananas Ready for Freeze-Drying
Picture the excitement you feel when you unbox a new espresso machine or take on a challenging recipe.
Well, get ready for a similar thrill because it's time to roll up your sleeves and dive into the nitty-gritty of preparing bananas for freeze-drying.
Whether you're aiming for healthy snacks, smoothie upgrades, or delightful desserts, freeze-dried bananas can shine in a wide range of dishes.
Let's break it down step by step.
- Choosing the Perfect Bananas: Begin with the basics: the bananas themselves. It's crucial to pick ripe ones. Overripe or under-ripe bananas might not give you the tasty results you're after. Look for bananas that are all yellow with just a few brown spots. And here's a little tip: if you bought them from a store, it's a good idea to give them a quick rinse under cold water. That way, you can get rid of any bacteria that might be hanging around.
- Peeling Like a Pro: Peeling a banana is something most of us can handle, even if we're not seasoned chefs. But when it comes to freeze-drying, there's a twist. You'll want to make sure you get rid of every bit of moisture. This step is essential to prevent ice crystals from forming during the drying process, which could mess things up.
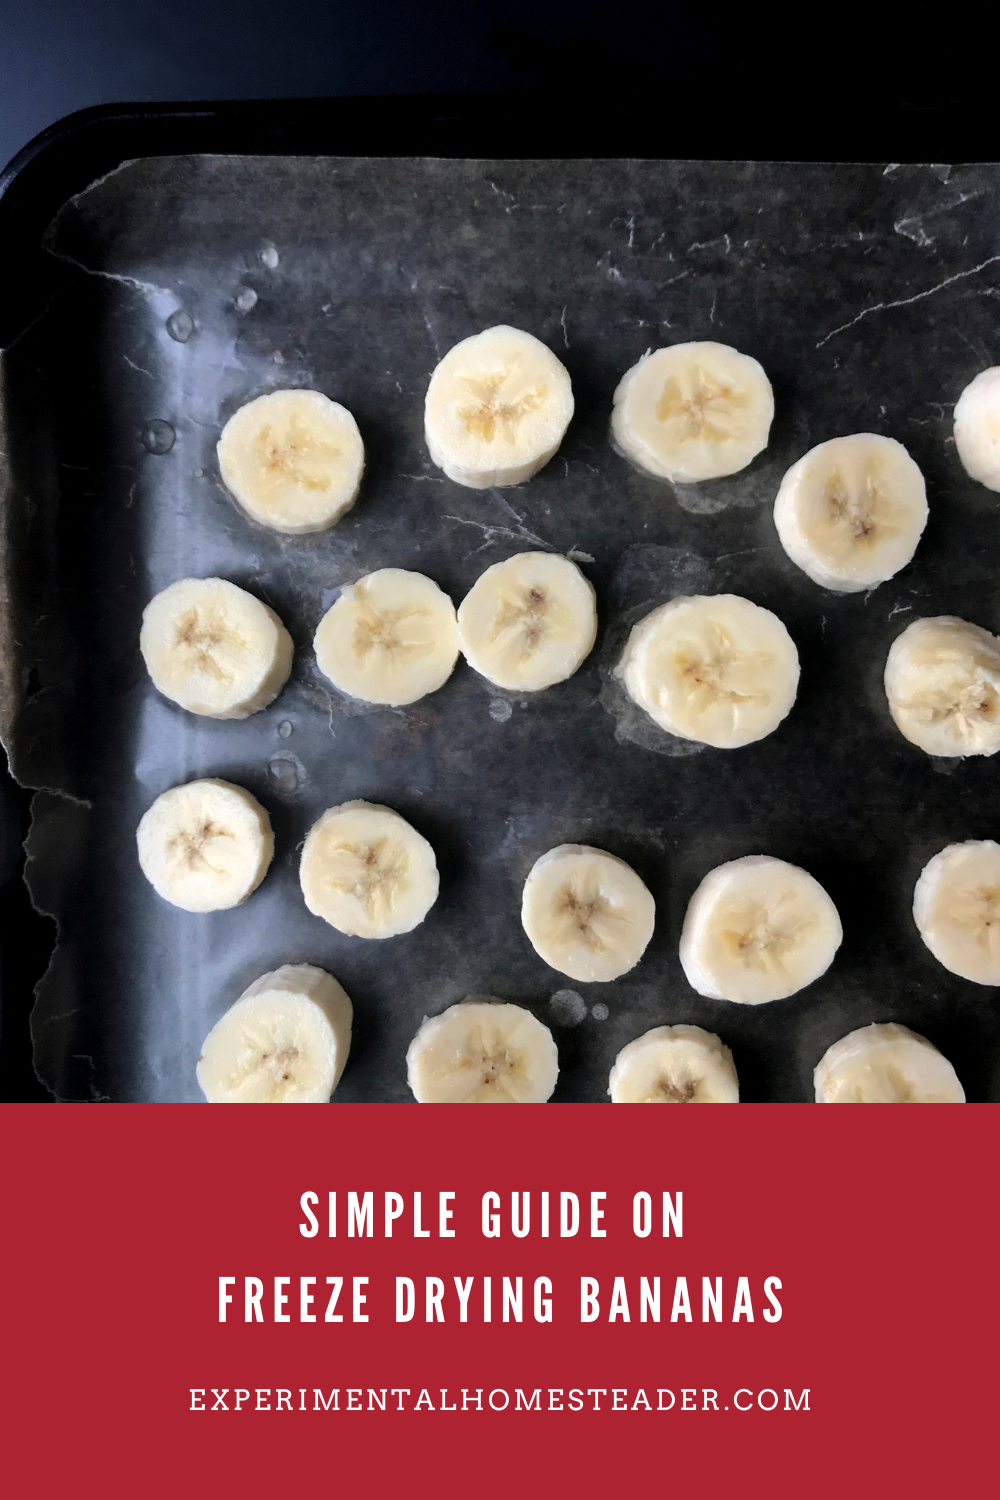
- Slicing for Success: Next, it's time to grab a knife. Slicing the banana isn't just about making it look good; it's about ensuring even drying. When you're cutting, aim for slices that are about a quarter-inch thick. Being precise at this stage will pay off later.
- A Zesty Touch: Before you start freeze-drying, there's a little bonus step you can consider. It involves dipping your banana slices in a mixture of lemon juice and water. This adds a bit of zing and helps the bananas keep their color. It's not mandatory, but if you're planning to use these freeze-dried bananas in a fancy dessert, it's worth a thought.
- Perfect Placement: Lastly, when you're ready to load your banana slices into the freeze dryer, make sure they're in a single layer on the rack or tray. Avoid letting them overlap; this could lead to uneven drying. So, give each banana slice some room to breathe!
With these steps wrapped up, you're all set to let the real magic happen.
Transfer those slices to your freeze dryer and let it work its wonders.
The result?
Crispy, sweet banana pieces ready to be enjoyed on their own or added as a special touch to your next standout dish.
Whether you're a pro chef reaching for new culinary heights or a home cook looking to impress your guests, freeze-dried bananas are a true game-changer.
Mastering Freeze-Drying in Your Homestead Kitchen
In the realm of homesteading, where tradition and innovation converge, there's a fascinating innovation that deserves your attention: freeze-drying.
It may sound a bit like science fiction, but it's a remarkable method for preserving the flavors and nutrients of fruits and vegetables, even those cherished bananas.
The Homestead Banana Adventure
Picture those ripe and delicious bananas sitting on your kitchen counter.
They hold the key to an exciting culinary journey - freeze-drying.
This adventure can transform your bananas into a versatile ingredient, perfect for enhancing smoothies, cereals, and even your baking endeavors.
Here is how to freeze dry bananas, step-by-step.
- Prep the Bananas: Begin by peeling the bananas and slicing them into uniform ¼ inch thick slices. Alternatively, you can cut the banana in half lengthwise and lay it on the tray.
- Load the Trays: Each tray can hold up to 2.5 pounds of bananas for a medium freeze dryer. If you like, consider pre-freezing the trays before loading them into the freeze dryer. This step is optional but can save you some time in the process.
- Place in the Freeze Dryer: Insert the loaded trays into your freeze dryer and securely shut the door. Now, start the machine and choose the appropriate setting: "frozen" if you pre-froze the bananas, or "not frozen" if you didn't. Then, simply let the machine do its work. As a tip, I recommend adding an extra 2 hours of drying time for the best results.
- Remove and Package: Once the machine has completed the process, carefully take out the trays. You can now package the freeze-dried bananas in mylar bags or containers. If you don't remove them immediately, the machine will keep them cold, so you'll want to warm the trays and bananas by selecting the "warm trays" setting. This helps prevent the bananas from absorbing extra moisture while you're packing them.
By following these steps, you'll have perfectly freeze-dried bananas ready for long-term storage and a variety of homestead culinary adventures.
Enjoy the Fruits of Your Labor
Once the dryer's hum has subsided, you'll be met with crisp, sweet, and fabulously freeze-dried bananas.
These are perfect for snacking, mixing into trail mixes, cereals, or smoothies.
You can even use them in your favorite recipes, like banana bread, for a delightful textural twist.
Print
Freeze Dried Bananas
Discover the art of freeze-drying and transform those ripe and delicious bananas into a versatile, long-lasting snack. Our easy-to-follow guide will lead you through the process, from selecting the perfect bananas to preserving their natural goodness for months to come. Whether you're a homesteader looking to enhance your pantry or a DIY enthusiast seeking a healthy snack solution, our freeze-dried banana recipe offers a unique culinary adventure. Learn how to preserve the essence of ripe bananas and enjoy the perfect, on-the-go snack that's both nutritious and delicious. Dive into the world of food preservation and add this homemade delight to your culinary repertoire.
- Total Time: 24 hours 20 minutes
- Yield: 2 pounds 1x
Ingredients
Instructions
- Prep the Bananas: Begin by peeling the bananas and slicing them into uniform ¼ inch thick slices. Alternatively, you can cut the banana in half lengthwise and lay it on the tray.
- Load the Trays: Each tray can hold up to 2.5 pounds of bananas for a medium freeze dryer. If you like, consider pre-freezing the trays before loading them into the freeze dryer. This step is optional but can save you some time in the process.
- Place in the Freeze Dryer: Insert the loaded trays into your freeze dryer and securely shut the door. Now, start the machine and choose the appropriate setting: "frozen" if you pre-froze the bananas, or "not frozen" if you didn't. Then, simply let the machine do its work. As a tip, I recommend adding an extra 2 hours of drying time for the best results.
- Remove and Package: Once the machine has completed the process, carefully take out the trays. You can now package the freeze-dried bananas in mylar bags or containers. If you don't remove them immediately, the machine will keep them cold, so you'll want to warm the trays and bananas by selecting the "warm trays" setting. This helps prevent the bananas from absorbing extra moisture while you're packing them.
Equipment
- Prep Time: 20 minutes
- Cook Time: 24 hours
Elevating the Everyday
When you pull a freeze-dried banana chip from its safely sealed storage, the time and diligence you put into each step of the process reaffirms their worth as a convienent and preserved snack.
Understanding, preparing, operating, and properly storing these banana chips, ensures that their incredible crunch and natural sweetness is preserved for many months.
Each crunchy bite reminds us that science and nature - coupled with a little DIY enthusiasm - can transcend the boundaries of time, delivering the fresh flavors of ripe bananas long after their season.
The magical, preservation dance of freeze drying technique allows us to enjoy the bounty of nature's gifts at any time and any place.
Freeze-drying takes the ordinary and turns it into something extraordinary.
It's a testament to culinary innovation and creativity, and the best part is, you can do it right in your own kitchen.
All you need is a passion for food, a dash of patience, and your kitchen can become an endless playground of culinary exploration.
How To Freeze Dry Food

Essential Freeze Drying Food Storage Tips for Homesteaders
Discover game-changing freeze drying food storage tips for homesteaders. Preserve your garden's bounty or bulk purchases with confidence.
How To Make Freeze Dried Sweet Corn At Home
Learn how to make freeze dried sweet corn at home. Freeze dried corn stored in mylar bags with oxygen absorbers lasts 25 years or more!

How To Freeze Dry Goat Milk
Learn how to freeze dry goat milk as well as other types of milk. Plus learn how to use it and how to store it long term.

Four Factors That Affect Food Storage
Understanding the four factors that affect food storage is essential for keeping your food safe, especially if you intend to store it long term.
Canning Broccoli Is No Longer Safe But You Can Still Preserve It
Although canning broccoli was once considered safe, times have changed thus freezing, dehydrating or freee drying broccoli is recommended.