How To Make The Ultimate DIY Bath And Body Product Gift Basket
Disclaimer: This is a sponsored post.

5 Non-Toxic DIY Bath & Body Products
The Ultimate DIY Bath & Body Products to fill The Ultimate DIY Bath & Body Product Gift Basket.... There are also links to products I recommend from companies I have a referral relationship with. I will be compensated if you make a purchase after clicking on my links.
How To Make Coconut Castile Liquid Soap Base
Coconut Castile Liquid Soap Base can be used to make many different kinds of soap... You can use it as a base for Homemade Shaving Cream, as an emulsifier for Sugar & Salt Scrubs. It would make a great liquid kitchen soap just as it is, or with some added oils, and herbs can make an effective body or hand wash.
Coconut Castile Liquid Soap Base
Ingredients:
- 32 oz. Coconut Oil
- 24 oz. Distilled Water
- 7.7 oz. Potassium Hydroxide (KOH/LYE)
Additional Items:
Vinegar, Paper Towels, Old Towels or Rags.
Safety Equipment:
Goggles, Gloves, Vapor Breathing Mask, Socks & Shoes.
Equipment:
- Large Stainless Steel Cooking Pot with lid
- 1 Gallon Heat Resistant Plastic Bucket with lid
- Container for weighing Lye
- Heat Resistant Spatula
- 1 Gallon container for finished soap, I like to use the empty distilled water container.
- Food or Postal Scale
Instructions:
- Weigh the coconut oil into a large stainless steel cooking pot. Place the pot on the stove and melt the coconut oil.
- Weigh the distilled water, and pour into a 1-gallon heat resistant bucket.
- Put on safety gear, goggles, gloves & vapor breathing mask,
- Weigh the potassium hydroxide (lye) and pour the lye into the plastic bucket with water, stir and cover bucket with lid.
- When coconut oil is melted, carefully add the lye to the stainless steel bucket of oil.!!!Slowly & carefully!!!
- Preheat the oven to 250 degrees.
- With the immersion blender mix oil and lye water till it becomes a batter, and is solid enough to hold a tracing on the surface.
- When the soap batter has traced, scrap all batter off the inside of the pot.
- With a damp paper towel wipe down the inside surfaces of the pot as low as you can to remove any soap that could brown and discolor the finished product.
- Cover and place pot of soap in the preheated oven set a timer for 30 minutes.
- After 30 minutes remove soap pot, and stir down the batter, wipe the sides down again, cover and put the pot back into the oven, set the timer for another 30 minutes.
- You can increase the oven temperature to 350 and cook for a total of 6 hours. Checking every hour stirring it down, and wiping down the insides to keep any soap from browning.
- The soap is down when it has cooked for 6 hours and has reached a vaseline like appearance.
- Now is the time to dilute the paste. Scrap down the sides, and with a clean wet paper wipe the inside of the soap pot down to remove any discolored soap paste.
- In another large pot heat, 70 weighed ozs. Of distilled water, and bring to a boil, add boiling water to the pot with liquid soap paste.
- Cover and put the pot of soap paste back in the oven, and turn off heat.
- Leave overnight to dissolve, in the morning the soap should have dissolved. If you see clumps of undissolved soap stir the pot, cover and put back in the oven, turn heat up to 350 and cook for another hour to see if that makes a difference, if not.
- Heat another 10 weighed oz. Distilled water, bringing your total to 80 ozs. Exactly how much it took me to dissolve this recipe. Put back in the oven at 350 for another hour.
- Is the soap dissolved? A few very small clumps will probably continue to dissolve over time, if they are small enough to pass through the opening of the container you plan to store your soap in using a funnel if you need to pour the liquid soap into the container.It will probably keep dissolving; it might take a few days to few weeks.
How To Make Shaving Cream
This is the nicest Shaving Cream I have ever used, it is non-toxic and you can easily make it from scratch at home... I made it with Coconut Castile Liquid Soap Base, but if you prefer you can use Dr. Bonners liquid Castile soap instead of making your own soap, it works just as well.
The Ultimate Shaving Cream
Ingredients:
- ¾ cup Coconut Castile Liquid Soap Base or 1 cup Dr. Bronners
- 1-½ cup Distilled Water
- ¾ cup baking Soda
Additional Items:
Paper towels or clean washcloth & towel
Safety Equipment:
Goggles
Equipment:
- Large stainless steel cooking pot
- Measuring cup or cups
- Immersion blender
- Quart canning jar
- Spatula
- Spoon
Instructions:
- Measure all the ingredients, and add them to the pot, stir well and put the pot on the stove
- Cook until bubbles reach the top of the pot or they stop growing.
- Remove the pot from heat and let it cool.
- When it has cooled and the bubbles are gone, stir the batter well incorporating all the liquids.
- Place pot back on the stove and cook a second time.
- It will not rise as much as the first time when it stops growing remove pot from the stove stir and set aside to cool.
- When cool stir the batter but do not scrape the sides down, I think scraping the sides makes the cream more scratchy.
- Scrape the batter off the bottom of the pot and fill the canning jar, one batch should fit in the jar.
- With the immersion blender inside the canning jar, blend in up and down strokes until batter is fully whipped. When done It will have the consistency of Shaving Cream
How To Make Sugar & Salt Scrub
A great non-toxic emulsified Sugar & Salt scrub,,, You can add more shaving cream, and liquid soap if you would like to emulsify more of the oils, try it once then decide.
The Ultimate Sugar & Salt Scrub
Ingredients:
- 1 8oz jar salt
- 1 8oz jar sugar
- 6 tbsp. coconut oil
- ¾ cup shaving cream
- 2.5 tbsp. liquid soap
Additional Items:
Alcohol & Paper Towels
Equipment:
- Stand or hand mixer
- Measuring spoons
- 1-8 oz. container for finished scrub
- Spatula
- Spoon
Instructions:
- Use the 8oz jar to measure salt & sugar put in mixing bowl.
- Measure coconut oil, into salt and sugar, add slowly with mixer running mix in well.
- Measure shaving cream ¼ cup at a time into mixing bowl with mixer running mix in well.
- Measure and slowly add liquid soap one tbsp. at a time to mixing bowl, with mixer running mix in well.
- Fill your jar & Enjoy!
How To Make Coconut Salt Bar
Oh, My Goodness this is the best Salt Bar I have ever used,,, I found that if I increased the poppy seeds I could get a grayer bar, but more or less both were great salt scrub bars...
The Ultimate Coconut Salt Bar
Ingredients:
- 16 oz. grated Bar Soap
- 5 oz. Salt
- 5 oz. Baking Soda
- 1.5 oz. Poppy Seed (optional)
- 3 tbsp. Olive Oil
- 24 tbsp. Distilled Water
Equipment:
- Large Bowl
- Large Stainless Steel Pot w/lid
- Measuring spoons
- Spatula
- Spoon
- Plastic containers for molds
Instructions:
- In a large bowl, add the salt, baking soda, and poppy seeds.
- Add 3 tbsp. Olive oil, and mix well.
- Weigh the grated soap and mix with salt, baking soda, poppy seed, olive oil mix.
- Move mix to the large stainless steel pot, cover with the lid and put the pot in the oven at 350 degrees.
- Check the progress of the salt bar batter every 15 - 30 minutes, when it has completely melted and is puffing up, remove from oven.
- Stir down the batter and quickly add to molds, and press down.
- Set filled molds in an out of the way place for several days, then unmold and let cure for two weeks.
How To Make Whipped Shea Body Butter
Do you Love Homemade Body Butters,,, I think you will love this one... Made with Unrefined Shea Butter, Organic Cocoa Butter, and Virgin Coconut Oil. The first thing I noticed was the wonderful chocolate smell... Then the smooth application, whipping makes the butter light and airy which allows it to go on smooth as silk... A must try, for a delicious smell & feel.
The Ultimate Whipped Shea Body Butter
Ingredients:
- 16 oz. Unrefined Shea Butter
- 8 oz. Organic Cocoa Butter
- 8 oz. Organic Virgin Coconut Oil
Additional Items:
Alcohol & Paper Towels
Equipment:
- Double Boiler or large pot
- Stand or hand mixer
- Mixing bowl
- Measuring spoons
- Empty containers
- Spatula
- Spoon
Instructions:
- Measure the fats and oils, into the mixing bowl.
- Place mixing bowl over a double boiler or large pot of boiling water.
- Let fats and oils melt.
- When fats and oils are melted mix well and set aside to cool.
- When fats are cool, start beating with mixer.
- Start beating the mix on low and as the fats get cooler and thicker speed up the mixer, till you are able to keep if full on.
- Use your freezer to speed up the process, it took me 5 - 3-minute episodes before my batter was cool enough to hold a whip.
- Scrape down the sides of the bowl, place in freezer for 3 minutes, use a timer. Then mix batter for a minute or two, then back into the freezer, doing the same every time.
- Watch the video for the exact way that I got the fats whipped...
- Fill your jars & Enjoy!
How To Make Natural Deodorant
No more Deodorants with aluminum, now you can make your own non-toxic deodorant with just 4 ingredients... Not only is it easy to make it works...
The Ultimate Natural & Effective Deodorant
Ingredients:
- 2 tbsp. Milk of Magnesia
- 2 tbsp. Aloe Vera Juice
- 1 tsp. Zinc Oxide
- 1 tsp. Arrow Root Powder
Additional Items:
2 oz. Mason jar or 2 one oz. Rollerball bottles
Equipment:
- Measuring cup
- Measuring spoons
Instructions:
- Measure ingredients into measuring cup and mix well.
- Fill Rollerballs bottle or store in a small Mason jar.
- Apply to underarms and allow to dry, us as needed.
Makes 2 oz. Enough for 2 - 1 oz. Rollerball bottles.
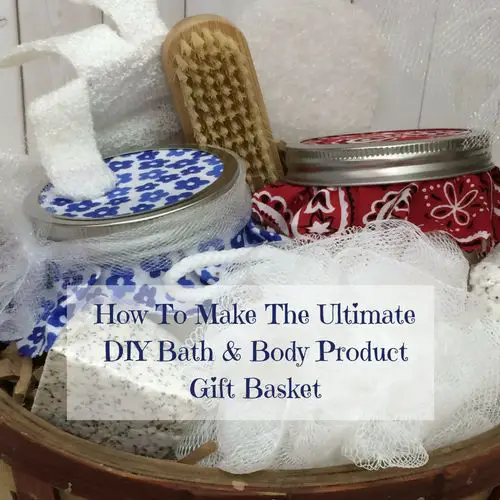
How To Make The Gift Basket
I enjoyed putting this gift basket together... I shopped my local Goodwill to find a suitable basket and they had many to choose from... The only drawback that I found from buying second hand was the fragrance, second-hand things are often scented when I bring them home... There are many other places to get cheap baskets, check out Walmart, or Michaels...
Start With A Basket
- Basket
- 4 or 5 DIY Bath & Body Products
- Fabric for Covering The Jars
- Tool or Ribbon for decorating the basket
- Sheet of Cellophane or Clear Gift Bag
- Paper shredder
- Colored Paper
- Cardboard
- Glue Dots from Michales
Bath Accessories:
- Nail Brush
- Bath Puff
- Exfoliating Glove
- Any Thing You Think Would Be Good...
Putting It Together
I used fat squares and made circles with my pinking sheers to cover the tops of the jars for the cute homey look... You can use glue dots to keep the fabric circles in place.
Then I used my crosscut paper shredder to make paper shreds.
Take the basket and some of the whole sheets of colored or other paper, crush the paper into balls, do enough to fill the basket near the top and place the paper shreds on that. Arrange jars and bath accessories in an attractive way, use glue dots to keep everything in place. You can also use cardboard to prop some things up... I put a strip of cardboard in the exfoliating glove so that it would stand up.
Then stuff your bath accessories around the jars of bath products, and make it all look attractive. Use ribbon and tool to further decorate... Cover the whole basket, with a cellophane bag or a large piece of cellophane, and tie with ribbons or tool...
Author
How To Make DIY Bath & Body Products for A Gift Basket has been written by Karen Coghlan author of Blue Yonder Urban Farms & Eat Real Whole Food blogs.
I highly recommend the following articles: