Coconut, Cinnamon and Rose Cookies with Swerve Sweetener
Disclaimer: The reviewer has received the product/service at a reduced price or for free. I am being compensated to participate in #Switch2Swerve challenge through the Bookieboo Influencer Network . I did switch out my regular sweetener for the Swerve Sweetener from November 18, 2013 through December 20, 2013. All opinions are my own and are my honest opinions based on my own experience with the product.
Coconut, cinnamon, and rose in the same cookie? I know that sounds like an unusual combination, but once I saw those flavors listed together in one of my favorite kitchen books, I couldn't get the idea out of my head. I had a bottle of coconut flavoring waiting to be used, and I wanted to see whether a little rose water and cinnamon could turn an ordinary rolled cookie into something special. That was the beginning of these coconut, cinnamon and rose cookies, and I couldn't wait to find out whether the combination would taste as good as it sounded.
There was another reason I wanted to make these cookies. I was taking part in a sweetener challenge, and a rolled cookie seemed like a good way to see how a sugar substitute would work in one of my baking projects. I also wanted to experiment with cutting the dough into decorative shapes, although I knew from past experience that getting those shapes right could be tricky. Between the unusual flavors, the rolled dough, and a little decorating, this turned into a fun baking experiment. You don't need any special equipment to make the recipe, either.

In This Article
How The Flavor Bible Inspired These Cookies
One of the books I love turning to when I'm experimenting in the kitchen is The Flavor Bible. When I want to try something new in the kitchen, I sometimes look up one ingredient and see what other flavors go with it. This time I started with coconut because I had a coconut flavoring oil I was eager to use. When I saw cinnamon and rose among the flavor possibilities, I started thinking about how those three might work together in a cookie.
Cinnamon and coconut both make sense in cookies, but rose water is the ingredient that makes people curious. Rose water is where you need a lighter hand. A little rose water adds a lovely floral note, but add too much and it's all you'll taste. I stuck with the amount in the recipe instead of adding more. Different brands of rose water and coconut flavoring can vary in strength, so measure carefully, particularly if yours is highly concentrated.
What I enjoyed about these cookies was that they weren't simply sweet. You get the warm cinnamon first, then a little coconut and floral flavor. And underneath those flavors, you can still taste the butter in the cookie.
Making The Cookie Dough
I start by letting the butter soften and getting my ingredients together: cake flour, Swerve, an egg, cinnamon, rose water, coconut extract, baking powder, and salt. I use cake flour for this recipe. There is a reason for that, especially when you want cookies that are tender but still hold their shape. Have your mixer, a bowl for cracking the egg, and some plastic wrap or a resealable bag ready.
Cake Flour Tip
Cake flour is usually finer and lower in protein than all-purpose flour. That means less gluten develops as you mix the dough, helping the finished cookies stay tender. All-purpose flour has more protein and can make rolled cookies a little firmer or chewier. Since I wanted a delicate cookie that I could roll and cut into shapes, I used cake flour. If you substitute all-purpose flour, expect the texture to change, and avoid overmixing the dough.
Cream the butter first, then add the Swerve and beat until the mixture looks lighter and fluffy. Crack the egg into a separate bowl before adding it. I always like cracking an egg into a separate bowl first, especially with eggs from the chickens. That way I can check it and fish out any shell before it ends up in the dough. Mix in the coconut extract, cinnamon, and rose water, then work in the baking powder, salt, and flour as directed in the recipe card.
I add the flour in portions rather than dumping it in all at once. Start with the first quarter cup, mix it in, then add about half of what remains. Once that is incorporated, add the rest. The dough needs to hold together for rolling, but once the flour is mixed in, there's no reason to keep the mixer running. Scrape down the sides of the bowl so there aren't pockets of dry ingredients hiding near the bottom.
When the dough is mixed, wrap it securely or press it into a resealable bag and refrigerate it until it is firm enough to roll and cut. I don't go by an exact chilling time here because dough firms up differently depending on how warm the butter and the kitchen are. What matters is how the dough feels, not how long it's been in the refrigerator. If it sticks badly to the rolling pin or won't hold a shape, it needs more chilling.

Rolling And Cutting The Cookies
Once the dough is firm, take out a portion and leave the rest chilled while you work. Roll it to about one-eighth of an inch thick, as the recipe specifies. Try to keep the thickness consistent from one side to the other. If one side is thinner than the other, those cookies can brown before the thicker ones finish baking.
A little flour on the work surface can help with sticking, but I wouldn't keep adding handfuls of flour to a soft dough. That changes the balance of the recipe. If the dough starts getting warm, put it back into the refrigerator for a bit. I find it easier to work with a smaller piece of dough at a time than to wrestle with the entire batch.
What Happened When I Tried The Cricut Cake
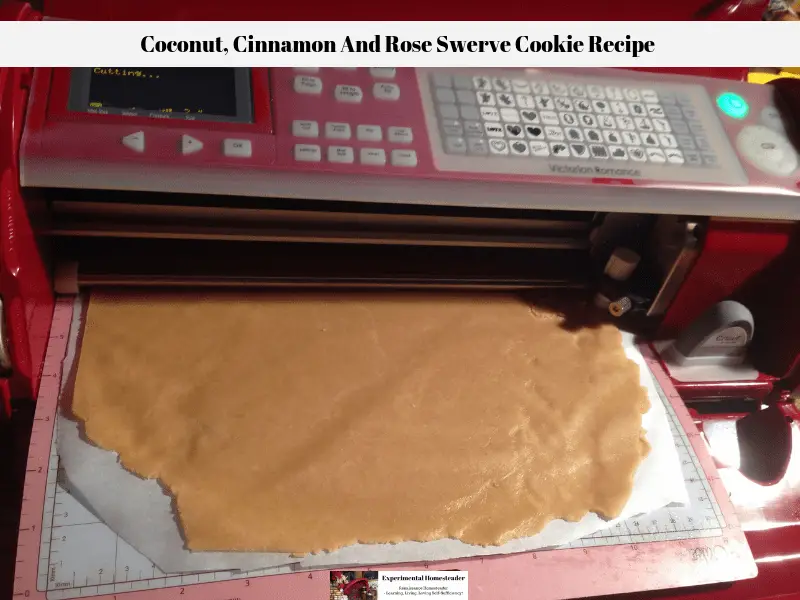
One reason I chose rolled sugar cookies in the first place was that I wanted to try cutting them with my Cricut Cake. My first attempt at cutting cookie dough with it hadn't gone well, and I wanted to give it another try. I did some research, worked on getting the dough firm enough, and tried again. Trying something again after it hasn't worked the first time is part of what I enjoy about baking.
I wish I could tell you that cutting cookie dough with the Cricut Cake was as simple as loading the mat and pushing a button, but that wasn't my experience. That first unsuccessful attempt was why I paid so much attention to the temperature and thickness of the dough this time. The dough has to be firm enough to hold its shape, yet workable enough for the machine to cut. If it is too soft, it can stretch, stick, or tear; if the shape is intricate, even a small amount of movement can spoil the detail.
Preparing The Cricut Cake Mat And Dough
Before cutting anything, I get the Cricut Cake mat and blade ready. These need to be the ones made for food, not a mat or blade you've already used for paper, vinyl, or other craft projects. Make sure the mat and blade are clean and dry, following the cleaning directions that came with the machine. Roll the dough into an even, thin sheet that fits within the mat's cutting area. A light coating of shortening on the mat can help the dough stay in place, but too much makes a slippery mess. Chill the rolled dough on the mat until it is firm before loading it into the machine.
Cutting Cookies With The Cricut Cake
I would start with a fairly large, simple design, especially if this is your first time trying cookies in the Cricut Cake. Those little details might look pretty on the screen, but getting them off the mat in one piece is another matter. Load the prepared mat, choose your design and size, and begin with a test cut rather than filling the whole mat. Check the machine's recommended blade depth, pressure, and speed for the food you are cutting. If the blade drags or the dough shifts, stop and adjust instead of letting it ruin the rest of the sheet. A slower cutting speed can help with delicate shapes, but the right settings depend on the thickness and firmness of your dough.
Once the cut is complete, unload the mat and carefully remove the dough surrounding the shapes. I use a small spatula reserved for kitchen use to lift the cookies, taking care not to stretch the edges. If the cut shapes feel too soft, chill the mat again before trying to remove them. If the dough starts sticking to the blade or tearing, I stop rather than trying to push through it. Stop, clean the food-contact parts as directed, and try again with firmer dough and a simpler shape.
The biggest lesson for me was to keep the dough cold and the first designs simple. Those tiny, intricate cuts can wait until you've figured out how your dough behaves. Follow the machine's food-safe preparation and cutting instructions, and use equipment intended for food. Be prepared to stop, chill the dough again, and try another cut. This is a project that calls for patience and experimentation, not a quick shortcut to perfect cookies.
Troubleshooting Cricut Cake Cookie Cuts
- The blade drags dough instead of cutting it. The dough may be too warm or thick, or it may be slipping on the mat. Chill the dough, check that it is evenly rolled, and try a simpler design.
- The shapes tear when you lift them. Chill the cut dough on the mat, then carefully lift each cookie with a thin spatula reserved for food use.
- The blade does not cut all the way through. Check the blade for dough buildup and follow the manufacturer's instructions for the appropriate cutting settings. Don't force the blade through the dough.
- The dough slips or bunches up on the mat. Stop the machine and check that the dough is properly chilled and securely positioned before trying again.
The important thing is to stop and correct the problem rather than forcing the machine to keep cutting. For detailed designs, make one small test cut before committing the rest of the dough. If intricate designs fall apart, try a larger, less delicate shape. I learned pretty quickly that this is one of those projects where you may need to make a few adjustments before you get a cut you're happy with.
When I'm finished, I remove any bits of dough and clean the blade and mat according to the directions that came with the Cricut Cake. Keep these supplies dedicated to food use. I keep the Cricut Cake supplies for food only. A blade or mat that's been used for vinyl or paper doesn't belong anywhere near cookie dough.
And if you don't have a Cricut Cake, don't worry. You can make these cookies with regular cookie cutters. Ordinary cookie cutters are easier to manage and often a better choice when you simply want a batch of cookies for the family. Press the cutter straight down, lift it cleanly, and move each shape carefully to the baking sheet.
For delicate shapes, try cutting on a lightly floured surface and use a thin spatula to lift them without pulling on the edges. If the dough starts stretching or sticking, stop. Don't keep adding flour just to force warm dough to cooperate. Instead freeze the sheet of cookie dough for 15 minutes before trying to cut shapes again.
After cutting the cookies, place the shapes on a parchment-lined baking sheet and freeze them for 15 minutes before baking. This extra step helps firm up the dough and can help the cookies hold their shape, whether you use ordinary cookie cutters or the Cricut Cake.

Baking And Decorating Coconut, Cinnamon And Rose Cookies
Bake the cut cookies at 350 degrees F for about 10 to 12 minutes, as directed in the original recipe. I would start checking toward the early end of that range, especially with smaller shapes or dough rolled very thin. I want the cookies baked through, but I don't wait until the edges are dark. Cookie size, baking sheet, and oven temperature all affect how quickly they finish.
Let the cookies cool before you decorate them. I used a very thin layer of homemade tinted icing made with Swerve and added some store-bought candy sprinkles. You don't need a thick blanket of frosting here. A thin coating was plenty. I wanted to taste the cookies, not cover up the coconut, cinnamon, and rose with icing.
I was especially pleased that my husband enjoyed them because he generally likes his sugar. He even took some cookies to work and shared them without telling everyone I'd used Swerve instead of regular sugar. Nobody asked about the sweetener. That made me smile because I had been experimenting with an unusual flavor combination and a different sweetener at the same time.
Troubleshooting And Making These Ahead
If the dough is sticking to the rolling pin, the cutter, and everything else, it's time to chill it again. Wrap it back up and chill it before trying again. If the shapes lose their detail, look at both the dough temperature and how much you're handling them after cutting. Keep the thickness even, too. A tray of very small cookies mixed with large shapes can bake unevenly, so I prefer to group similar sizes together.
If the rose water seems a little strong, I wouldn't start adding extra coconut or cinnamon to compensate. Make a note for the next batch instead. Rose water varies from one brand to another, and the best result is a cookie where no single flavor takes over. If you're new to floral baking, measure the rose water carefully and make sure you're using food-grade rose water intended for cooking.
I also like that I can make the dough ahead of time, wrap it well, and leave it in the refrigerator until I'm ready to roll and cut the cookies. That's especially handy during the holidays. You can also bake the cookies ahead and wait until they're completely cool to decorate. Once the icing has set, store them in a covered container so they don't dry out. Separate decorated layers with parchment if the icing or sprinkles might stick.
More Cookies And Homemade Holiday Treats
If you enjoy experimenting with homemade cookies, you might also like my emoji toasted pecan orange sugar cookies or my chocolate peppermint brownies with Swerve frosting. For more ways to use flowers in the kitchen, visit my cooking with edible flowers and herbs guide. I love finding ways to make ordinary baking a little more interesting, whether that means changing the flavors or just having fun with the decorations.
Have you ever baked with rose water, or tried cutting cookie dough with a Cricut Cake? I'd love to hear what worked for you and what you would try differently next time.
Print
Coconut, Cinnamon And Rose Swerve Cookie Recipe
Buttery cut-out cookies flavored with coconut, cinnamon, and rose water, made with Swerve Sweetener. Chill, roll, cut, freeze the shapes briefly, and bake.
- Total Time: 2 days 57 minutes
- Yield: Approximately 24 cookies 1x
Ingredients
- 2 ¼ cups cake flour
- 1 cup butter
- 1 cup Swerve Sweetener
- 1 egg
- 1 ½ teaspoon ground cinnamon
- 1 teaspoon rose water
- 1 teaspoon coconut extract
- ¼ teaspoon baking powder
- ⅛ teaspoon salt
Instructions
- Cream butter.
- Add Swerve Sweetener to the creamed butter and beat on medium speed until light and fluffy.
- Add the egg (be sure to break it into a bowl first especially if it is a farm fresh egg), coconut extract, ground cinnamon and rose water.
- Beat until well mixed.
- Add in the baking powder, salt and ¼ cup of cake flour. Beat on medium speed until combined.
- Add in half of the remaining flour. Continue mixing until the flour is incorporated into the mixture.
- Add the rest of the flour and beat again.

- Once the flour is well mixed into the cookie dough, shut the mixer off and scoop the cookie dough onto Saran Wrap and roll it up. An alternative is to scoop it into a Ziplock bag, press the air out and seal it.
- Put the wrapped cookie dough into the refrigerator so the flavors combine and the dough firms up.
- Remove the dough from the refrigerator.
- Roll it out so it is ⅛ inch thick.
- Run the dough through the Cricut Cake Machine or use cookie cutters to cut out shapes.
- Arrange the cut cookies on a parchment-lined baking sheet and freeze them for 15 minutes to help the shapes hold their edges.
- Bake the cookies at 350 degrees F for 10 to 12 minutes.
- Remove the cookies from the cookie sheet and cool.
- Frost or decorate the cookies as desired once they are completely cool.

Notes
For cleaner shapes, place the cut cookies on a parchment-lined baking sheet and freeze for 15 minutes before baking. Cricut Cake cutting can be difficult; ordinary cookie cutters work well too. Refrigerate the dough until firm before rolling. Baking time varies with cookie size and thickness.
- Prep Time: 30 minutes
- Refrigerating dough and freezing cut cookies: 2 days 15 minutes
- Cook Time: 12 minutes
Nutrition
- Serving Size: 1 cookie