DIY Thanksgiving Chalkboard Art
Disclaimer: I did receive the Americana Chalkboard Paint for this project from DecoArt in exchange for my honest, unbiased review. All opinions are my own.

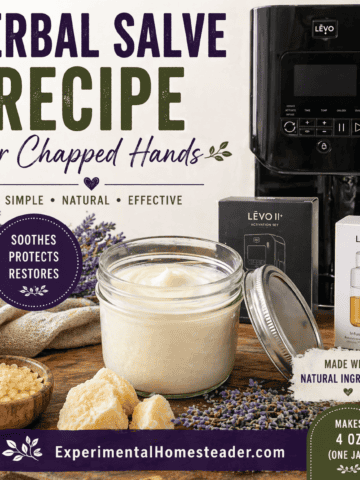
This DIY Thanksgiving Chalkboard Art is super cute and a great way to welcome guests to your home for Thanksgiving dinner.
Cricut Project Primrose
Recently I received a Cricut Explore Air at a discounted price with the intention of doing some beta testing on the Project Primrose site that Cricut set up.
The site is really cool because you can share projects you have created with other users - and see what they are creating.
You do have to request a profile before you can start to share projects but if you are super creative or spend a lot of time working with your Cricut, I do recommend checking into the site.
My third project was this Happy Thanksgiving DIY Chalkboard Sign.
The first step was to find a used chalkboard and re-do it using DecoArt paint.
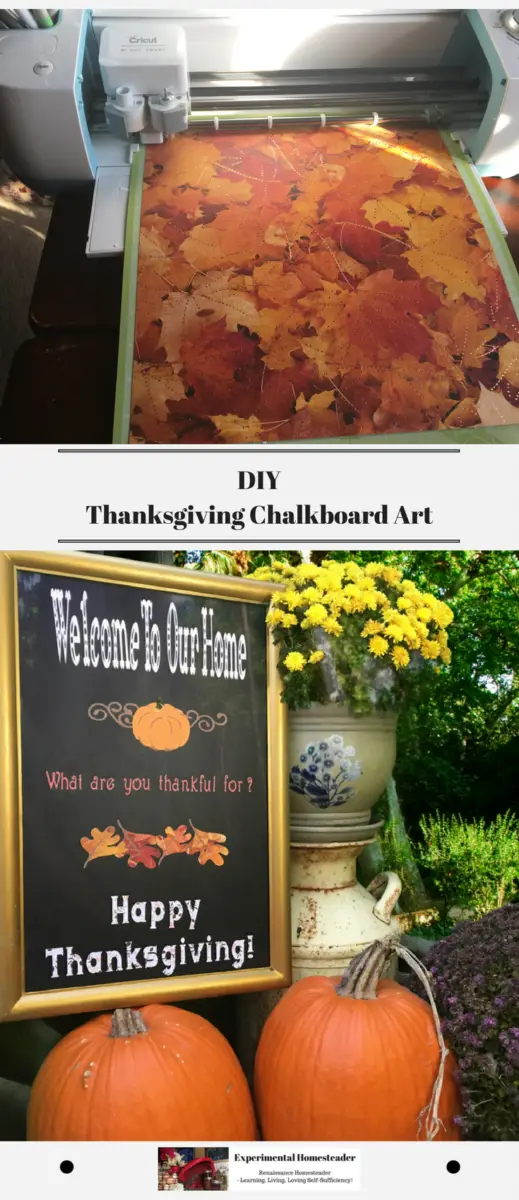
I then used my Cricut Explore Air to cut all the pieces out, then assembled the pieces and attached them to the chalkboard.
Here is how I did this project, step-by-step. It did take me two days to complete the project.
Paint The Chalkboard
I found a used chalkboard at a local flea market.
The previous owners had painted on the chalkboard and the finish was pretty messed up because you could see the old chalk writings still.
The frame was a turquoise - which wasn't bad but I wanted this sign for Thanksgiving so I needed it to be less bold and blend in more with the natural fall colors.
I do work with DecoArt - and they had sent me a 2oz. borrow of their Americana Chalkboard Paint, so I decided to refinish the chalkboard first and see if I could cover up the paint.
I did have to use several coats of the paint but I was able to make the chalkboard look brand new. I used a foam brush to spread the paint on with.
Paint The Chalkboard Frame
The next step was to paint the frame.
I had a bottle of DecoArt Dazzling Metallics Acrylic Paint in Venetian Gold on hand.
I had purchased this 2oz. bottle of paint for another project but had quite a bit leftover so I decided to use it for the frame.
I used a small paintbrush and applied four thin coats.
I wanted some of the turquoise to show through to give it a patina look.
I was quite happy with the outcome.
I did work on this project outside and I did use some plastic to cover my work area so when I painted the edges I did not end up with paint on my deck.
I allowed the newly painted chalkboard to dry overnight.
Print
DIY Thanksgiving Chalkboard Art
Ingredients
- 2 oz. Americana Chalkboard Paint
- 2 oz. DecoArt Dazzling Metallics Acrylic Paint in Venetian Gold
- 2 12" x 12" sheets brown cardstock
- 1 12" x 12" sheet fall leaf cardstock
- 1 12" x 12" sheet patterned orange cardstock
- 1 12" x 12" sheet white foil patterned cardstock
- 1 12" x 12" sheet black cardstock
- 1 12" x 12" sheet orange patterned cardstock
- 1 12" x 12" sheet orange cardstock
- 1 12" x 12" sheet green cardstock
Instructions
- The first step is to put a new coat of chalkboard paint on the chalkboard if you chose to purchase a used one.
- Allow the paint to dry thoroughly.
- Then paint the frame of the chalkboard with four thin coats of paint.
- Allow this to dry overnight.
- Set the design up in the Cricut Design Space then opened the app on your iPad.
- Click here for the design template.
- Connect the iPad to the Bluetooth connection on the Cricut Explore Air.
- Cut the images, switching out the colors of the paper as needed.
- Once all the pieces of the design are cut out, glue the ones together that have backs.
- Use a glue stick to apply glue to the back of the cutouts then quickly press them onto the chalkboard.
- Allow the project to thoroughly dry and display as desired.
I highly recommend the following articles:
- Table Decorations For Thanksgiving
- Awesome Ideas For An Eco-Friendly Thanksgiving
- Fall Decorating Round Up Post
- How To Make Birthday Safari Theme Decorations
- Easy Handmade Birthday Cards For Mom
Use the buttons on the right side to share this article with friends or family who might find it useful. Pin the picture below to your pinboard on Pinterest for future reference.