Ingredients
Scale
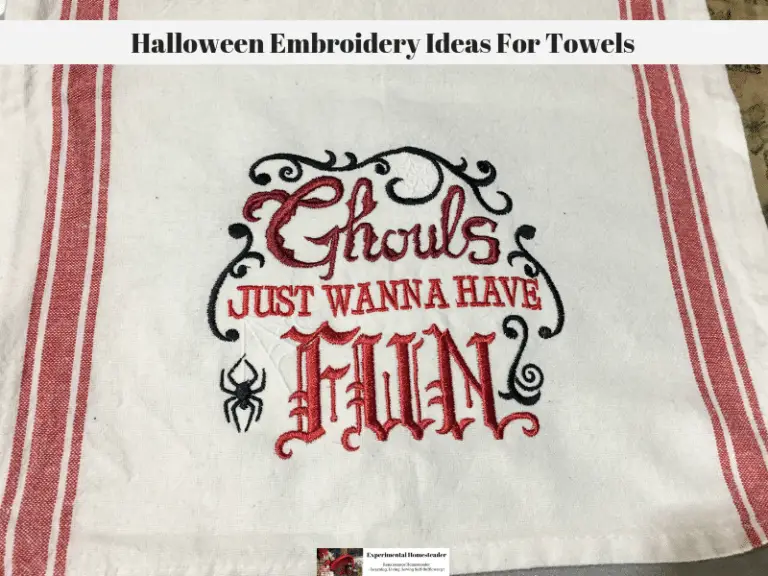
- Sulky Thread PF190 (Fun)
- Sulky Thread PF1586 (Ghoul)
- Sulky Thread 1147 (Just Wanna)
- Sulky Thread 268d
- Glow-in-the-dark thread (spiders)
- flour sack towel, washed
- Sulllivans Stitch & Ditch Stabilizer
- Ghouls Just Wanna Have Fun Design From Urban Threads
Instructions
- Wash and dry the flour sack towel before you begin this project.
- Iron the flour sack towel.
- Choose the proper size embroidery hoop. I used a 6" x 10" hoop.
- Cut six layers of the stitch & ditch stabilizer.
- Lay these on top of the bottom part of the embroidery hoop.
- Lay the portion of the towel you wish to embroidery on top of the stabilizer.
- Now secure the top part of the hoop to the bottom part of the hoop.
- Once the embroidery hoop is securely holding the stabilizer the towel, go ahead and attach it to your embroidery machine.
- Set up your embroidery machine, bring the design up so it is ready to stitch and gather all of the thread needed for this project.
- The design - on my machine started with the spider webs. They are meant to be black. I chose to use a glow-in-the-dark thread for them. I let the machine stitch both of them out and paid close attention. Once I knew the spider webs were stitched I manually stopped the embroidery machine and removed the glow-in-the-dark thread. I replaced it with the black thread.
- My machine did stop in between all the other color changes which made switching out the thread colors so much easier.
- When the stitching is complete, remove the embroidery hoop from your embroidery machine and shut it off.
- Now there is going to be some thread trimming that needs done and the excess stabilizer will need to be removed.
- Now your Halloween embroidered flour sack towel is ready for use.
Notes
Note: This design took approximately 80 minutes to stitch on the Brother ULT2001.


